| |
Pure Software code |
|
| |
Lebanon  | |
|
|
|
|
Python Pages -
1
2
3 4
5
6 |
|
|
|
| |
| |
|
|
1- Introduction |
Note:
1- in Visual Studio 2017, 2019 or
2022. I ended up with a folder where new
projects were created by default in C:\users\%username%\source\repos
2- C:\users\%username%\source\repos =
C:\users\...\source\repos |
| |
|
1.1-
Best Practices to Make Your Python More
Readable |
-
One Statement of Code per Line.
-
Explicit code.
-
Passing args to Functions.
-
Return Statements.
-
Writing Idiomatic Python.
-
Access a Dictionary Element.
-
Filtering a List.
-
Updating Values in a List.
|
|
|
1.2-
The tkinter
package (“Tk interface”) :
|
- The Canvas widget
supplies graphics facilities for Tkinter. Among these
graphical objects are lines, circles, images, and even other
widgets. With this widget it's possible to draw graphs and
plots, create graphics editors, and implement various kinds
of custom widgets.
- The tkinter package
(“Tk interface”) is the standard Python interface to the Tk
GUI toolkit. Both Tk and tkinter are available on most Unix
platforms, as well as on Windows systems. (Tk itself is not
part of Python; it is maintained at ActiveState.)
- Running python -m
tkinter from the command line should open a window
demonstrating a simple Tk interface, letting you know that
tkinter is properly installed on your system, and also
showing what version of Tcl/Tk is installed
|
|
1.3-
The
place Geometry Manager |
|
- The place geometry manager is different than
grid or pack. Rather than referencing against a
cell location or a window's side, most of the
time you'll be using a relative form of x and y
coordinates. You can also use place to overlap
portions of widgets, which isn't allowed in
either grid or pack.
Invoking place is similar to calling the other
geometry managers:
$widget->place( [ option => value, . . . ] )
- more
Detail, The place Geometry Manager:
 |
Continue
|
more
Detail, The place Geometry Manager | |
|
|
| |
| |
|
The options specified when you call
place affect
how the widgets are put on the screen.
1.3.1. place Options
The following options can be used with
place:
- -anchor => 'n' | 'ne' | 'e' | 'se' | 's' | 'sw' | 'w' | 'nw' | 'center'
-
Sets the position in the widget that will be placed at the specified
coordinates.
- -bordermode => 'inside' | 'outside' | 'ignore'
-
Determines whether or not the border
portion of the widget is included in the coordinate system.
- -height =>
amount
-
Sets the absolute height of the widget.
- -in => $window
-
ndicates that the child widget will be
packed inside $window instead of in the parent
that created it. Any relative coordinates or sizes will still refer
to the parent.
- -relheight =>
ratio
-
Indicates
that the height of the widget relates to the parent widget's
height by ratio.
- -relwidth =>
ratio
-
Indicates that the width of the widget
relates to the parent widget's width by ratio.
- -relx =>
xratio
-
Indicates that
the widget will be placed relative to its parent by
xratio.
- -rely =>
yratio
-
Indicates that the widget will be placed relative to its parent by
yratio.
- -width =>
amount
-
Indicates that the width of the widget will be
amount.
- -x =>
x
-
Indicates that the widget will be placed at
x.
x is any
valid screen distance.
- -y =>
y
-
Indicates that the widget will be placed at
y.
y is any
valid screen distance.
1.3.2. Absolute Coordinates
The parent window (or Frame) has a
standard coordinate system where (0, 0) is in the upper-left corner.
The x values increase to the right, and the y values increase as you
go down. See Figure 1.3.2a.
Figure
1.3.2a. Coordinate system of parent window when absolute coordinates are used
To use absolute coordinates to specify
where to place the widget, we would use options
-x and
-y:
-x => x, -y => y
Valid values
for x and y are valid
screen distances (e.g., 5, which is in pixels). The widget will have
its anchor position (controlled by
-anchor) placed
at the x and y coordinates. The default anchor is
"nw", the upper-left corner of the window.
Another major difference between
place and the
other geometry managers is that at least two arguments are required
when place is invoked. There are no default values
for the -x and
-y options. You will get an
error if you try to invoke
place with no arguments
(for example, $widget->place( )).
The simplest example of using
-x and
-y is to place a widget at (0, 0):
$mw->Button(-text => "Exit",
-command => sub { exit })->place(-x => 0, -y => 0);
As you would expect, the widget ends up in the upper-left corner of
the window as shown in Figure 1.3.2b. No matter what
size the window, our widget will remain positioned at (0, 0). Even
when the window is resized to be as small as possible, the widget
will not move.
Figure 1.3.2b. Button placed using -x => 0, -y => 0
Here is an example of using-x and
-y to create
some overlapping widgets:
$mw->Button(-text => "Exit",
-command => sub { exit })->place(-x => 10, -y => 10);
$mw->Button(-text => "Exit",
-command => sub { exit })->place(-x => 20, -y => 20);
Figure 1.3.2c shows the resulting window.
Figure 1.3.2c. Overlapping Buttons using place
1.3.3. Relative Coordinates
There is an additional coordinate
system defined in place for the parent widget that
allows relative placement within it. This coordinate system is shown
in Figure 1.3.3a.
Figure 1.3.3a. The relative coordinate system
The upper-left corner has the coordinates (0.0, 0.0). The lower-right
corner's coordinates are (1.0, 1.0). The middle of the window
would be (0.5, 0.5). The coordinates are specified in floating-point
form to allow place to handle any size window.
This allows the widget to remain at that position (in the center, for
instance) no matter how the window is resized.
It is valid to specify coordinates both smaller than 0.0 and larger
than 1.0; however, your widget might not be completely visible in the
window when you use out-of-range coordinates.
This code snippet produces the Button shown in Figure 1.3.3b:
$b = $mw->Button(-text => "Exit", -command => sub { exit });
$b->place(-relx => 0.5, -rely => 0.5);
Figure 1.3.3b. Using place with -relx => 0.5, -rely => 0.5
Although the Button in Figure 1.3.3b is placed in the
middle of the screen, it looks off-center because the upper-left
corner of the widget was placed in the middle of the window instead
of the center. You can change this with the
-anchor option, which we will discuss shortly. If
we resize this window, the Button still stays in the middle of the
window (see Figure 1.3.3c).
Figure 1.3.3c. -relx => 0.5, -rely => 0.5 window resized to be larger
This next example creates two Buttons, both placed in the window with
relative coordinates:
$mw->Button(-text => "Exit",
-command => sub { exit })->place(-relx => 0.2,
-rely => 0.2);
$mw->Button(-text => "Exit",
-command => sub { exit })->place(-relx => 0.5,
-rely => 0.5);
No matter what size the window is or where other widgets are in the
screen, the two Buttons will stay in those relative locations (see
Figure 1.3.3d).
Figure 1.3.3d. Two Buttons placed relative to the parent window
The left window in Figure 1.3.3d is the default size
of the window when it was created. The right window is what it looks
like after the window was resized to make it much smaller. Notice
that the second Button placed in the window remains on top. It does
so because we are still maintaining the ordered list of widgets in
the window; the second Exit Button, placed at (0.5, 0.5), is drawn
last, so it's drawn on top of the other Button.
You can also combine the absolute and relative coordinate systems
simply by using both in the argument list. The relative coordinate
system is considered first, then the x or y value is added to that
position. The options -relx => 0.5,
-x
=> -10 place the widget 10 pixels to the left of the
middle of the window. 1.3.4. Anchoring the Widget
Think of the child widget as a piece of paper that you want to put on
your bulletin board (the board is the parent widget). You have a tack
that you are going to use to keep the paper up on the board. You can
put the tack right through the center of the paper, in the upper-left
corner ("nw"), or in the lower-right corner
("se"). The point where the tack is going to stick
the paper to the board is the
-anchor point. The
-anchor point on the widget is
"tacked" to the coordinates given by
-x,
-y, and/or
-relx,
-rely. The default
-anchor is
"nw". Figure 2-40 shows these
-anchor points
within the child widget.
It is important to know where the
-anchor is,
because it will affect how we see the widget within the parent.
In Figure 1.3.4a, almost identical
place commands were used to put the Exit Button in
the window, but the -anchor value was changed. The
left window's Button was created with this command:
$mw->Button(-text => "Exit",
-command => sub { exit })->place(-relx => 0.5,
-rely => 0.5);
The window on the right in Figure 1.3.4a used this
command:
$mw->Button(-text => "Exit",
-command => sub { exit })->place(-relx => 0.5,
-anchor => "center",
-rely => 0.5);
As with
pack and
grid, the
possible values for -anchor are:
'n',
'e',
's',
'w',
'center',
'nw',
'sw',
'ne', and
'se'. However, the value now refers to the child
widget instead of the position within the allocation rectangle.
Figure 1.3.4a. Different -anchor values affect where the widget is placed in the window
1.3.5. Width and Height
When you use
place, you can specify the width and
height of the widget in one of three ways:
-
Allow the widget to determine its own size.
-
Specify width and/or height in absolute measurements.
-
Specify width and/or height in relative measurements (relative to the
parent widget).
To let the widgets determine their own sizes, no options are
specified. You can set the widgets' sizes with the following
options: -width and
-height,
or-relwidth and
-relheight, respectively.
The
-width and
-height options
allow you to specify the exact width or height of the widget in a
screen distance:
-width => amount, -height => amount
Each amount is a valid screen distance (discussed earlier in this
chapter under pack). The widget will obey these
options even if it has to cut off edges of the items displayed in it.
Our Button looks quite silly on the screen when we use a
-width of 40 pixels (see Figure 1.3.5a).
$mw->Button(-text => "This Button Will Cause the Program to Exit",
-command => sub { exit })->place(-x => 0, -y => 0,
-width => 40);
Figure 1.3.5a. Using -width with place
The other two options,
-relwidth and
-relheight, determine the widget in relation to
the parent widget.
-relwidth => ratio, -relheight => ratio
The
ratio is a floating-point number
(similar to that specified by
-relx or
-rely). A value of 1.0 will make the widget as
wide (or as tall) as the parent widget. A value of 0.5 will make the
widget half as wide as the parent (see Figure 1.3.5b).
Figure 1.3.5b. Example of the same window resized with -relwidth => 0.5, -relheight => 0.5
The options
-width and
-relwidth are additive when used together, and so
are -height and
-relheight.
1.3.6. Border Options
Normally the border of the widget is used as the edge of the possible
space in the window, which means any widgets placed with either the
absolute or relative coordinate system will be placed inside the
border. This can be changed by using the
-bordermode option:
-bordermode => 'inside' | 'outside' | 'ignore'
Using
'outside' will allow the coordinate system
to use the space occupied by the border as well. A value of
'ignore' will have the coordinate system use the
space designated as the official X area. Overall, this option is
pretty useless, as you can see from the difference each makes in Figure 1.3.6a.
Figure 1.3.6a. -bordermode examples
If you look very closely (get out your magnifying glass), you can see
that the 'outside' version is two pixels higher
and two pixels farther to the left than the
'inside' version. This is because with one window
manager ( fvwm), the border is defined as 2
pixels.
|
| |
1.3.7.
Setting the position of Tkinter labels
We can
use
place() method to set the position of the
Tkinter labels.
-
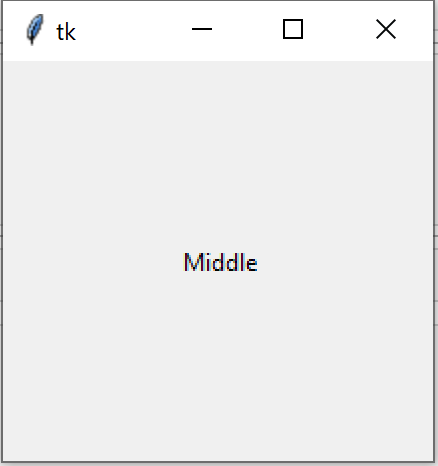
Example 1: Placing label at the
middle of the window
|
Python code |
output |
|
import
                                        tkinter as
                                        tk
root
=
tk.Tk()
Label_middle
=
tk.Label(root,
text
='Middle')
Label_middle.place(relx
=
0.5,
rely
=
0.5,
anchor
=
'center')
root.mainloop()
|
 |
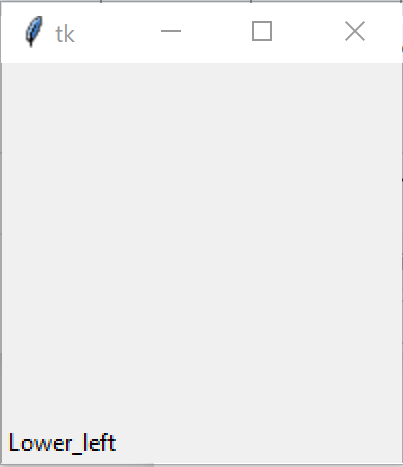
-
Example 2: Placing label at the
lower left side of window
| Python
code |
Output |
|
import
tkinter as tk
root
=
tk.Tk()
Lower_left
=
tk.Label(root,text
='Lower_left')
Lower_left.place(relx
=
0.0,
rely
=
1.0,
anchor
='sw')
root.mainloop()
|
 |
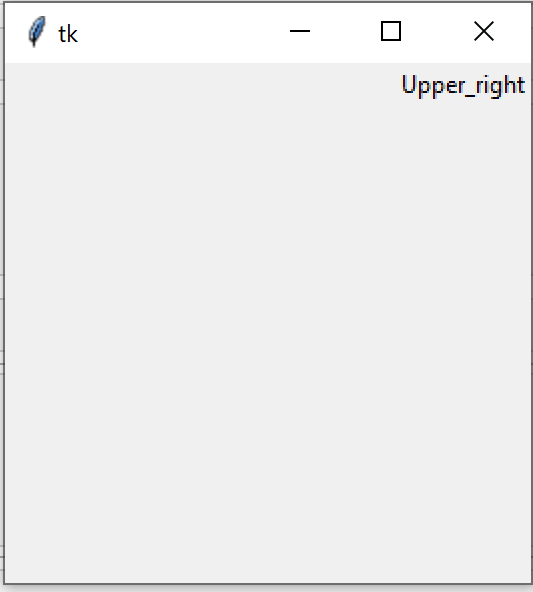
-
Example 3: Placing label at the
upper right side of window
|
Python code |
Output |
|
import
tkinter as tk
root
=
tk.Tk()
Upper_right
=
tk.Label(root,text
='Upper_right')
Upper_right.place(relx
=
1.0,
rely
=
0.0,
anchor
='ne')
root.mainloop()
|
 |
|
| |
|
| | |
|
| | |
|
|
| |
| |
| 2- |
Python, Use
Tkinter Moduke to display Circle and
Line |
|
|
| |
|
|
- Python program, of tkinter and random Module to display the complex Graphics facilities, Circles and Lines
- Create a new Python project In Visual Studio 2022
- the
Microsoft Visual Studio (... or 2019 or 2022) is
a powerful IDE for Python language
-
Open/Run Microsoft Visual Studio 2022
- To
view Python templates, search for python.
 |
Select
the
Python Application template,
and select
Next. |
- Create a new Python project In Visual Studio 2022
On the Configure your new project
screen - (specify a name and
file location for the project, and then select
Create)
Project name: Py_B3
Location: C:\Users\...\source\repos
(default location for
Visual Studio 2022)
|
- The new project opens in Visual Studio 2022
- (Visual Studio 2022 Compiler - IDE, to compile Python
project / file )
- The
Visual Studio Solution Explorer window shows the
project structure
- Python
Project Properieties -
Py_B3
- Projct
Folder:
C:\Users\...\source\repos\Py_B3
- Startup
File: Py_B3.py
- Project
file: Py_B3.sln
|
- Download Python
Project : Py_B3.zip - (8.6
KB zip file) Download
-
Project consist of:
One Python Form - (Py_B3.py )
|
 | |
|
Download Python
Project : Py_B3.zip - (8.6
KB zip file) Download |
- Source Code:
|
Download this Source Code at
python file: Py_B3.py -
(1.52 KB Python file) download
|
|
Continue
|
Python Code, to display the complex Graphics facilities, Circles and Lines | |
|
|
| |
|
import
tkinter
as
tk
import
random
as
rd
class
AppliCanevas(tk.Tk):
def __init__(self):
tk.Tk.__init__(self)
self.size = 500
self.creer_widgets()
def creer_widgets(self):
# création canevas
self.canv =
tk.Canvas(self, bg="light gray", height=self.size, width=self.size)
self.canv.pack(side=tk.LEFT)
# load circles and
line
self.dessine_cercles()
self.dessine_lignes()
# boutons
self.bouton_cercles =
tk.Button(self, text="Circle !", command=self.dessine_cercles)
self.bouton_cercles.pack(side=tk.TOP)
self.bouton_lignes =
tk.Button(self, text="Lines !", command=self.dessine_lignes)
self.bouton_lignes.pack()
self.bouton_quitter =
tk.Button(self, text="Exit", command=self.quit)
self.bouton_quitter.pack(side=tk.BOTTOM)
def rd_col(self):
return
rd.choice(("black",
"red",
"green",
"blue",
"yellow",
"magenta",
"cyan",
"white",
"purple"))
def dessine_cercles(self):
for i
in
range(100):
x, y = [rd.randint(1,
self.size)
for
j
in
range(2)]
diameter =
rd.randint(1, 50)
self.canv.create_oval(x, y,
x+diameter, y+diameter, fill=self.rd_col())
def dessine_lignes(self):
for i
in
range(100):
x, y, x2, y2 = [rd.randint(1,
self.size)
for
j
in
range(4)]
self.canv.create_line(x, y, x2, y2,
fill=self.rd_col())
if __name__
==
"__main__":
app =
AppliCanevas()
#app.title( "Mon Canevas Psychédélique
!")
app.mainloop() |
| |
|
|
| | |
- Output: "Mon Canevas Psychédélique !"
|
| | |
|
| |
|
| 3- |
Python Programs,
to display Calculator (Functions ...) |
|
|
| |
|
| 3.1- Python Calculator, Design 1 |
|
- Python program, of tkinter Module to
display Calculator (Functions
...)
- Create a new Python project In Visual Studio 2022
- the
Microsoft Visual Studio (... or 2019 or 2022) is
a powerful IDE for Python language
-
Open/Run Microsoft Visual Studio 2022
- To
view Python templates, search for python.
|
|
Select
the
Python Application template,
and select
Next. |
- Create a new Python project In Visual Studio 2022
On the Configure your new project
screen - (specify a name and
file location for the project, and then select
Create)
Project name: calc
Location: C:\Users\...\source\repos
(default location for
Visual Studio 2022)
|
- The new project opens in Visual Studio 2022
- (Visual Studio 2022 Compiler - IDE, to compile Python
project / file )
- The
Visual Studio Solution Explorer window shows the
project structure
- Python
Project Properieties -
calc
- Projct
Folder:
C:\Users\...\source\repos\calc
- Startup
File: calc.py
- Project
file: calc.sln
|
- Download Python
Project : calc.zip - (9.1
KB zip file) Download
-
Project consist of:
One Python Form - (calc.py )
|
 | |
|
Download Python
Project : calc.zip - (9.1
KB zip file) Download |
- Source Code:
|
Download this
Source Code at python file: calc.py
- (2.6 KB python file)
download
|
|
Continue
|
Python Code,
to display Calculator (Functions
...) | |
|
|
| |
from tkinter import *
def
iCalc(source, side):
storeObj = Frame(source, borderwidth=3, bd=3,
bg="powder blue")
storeObj.pack(side= side, expand =YES, fill =BOTH)
return storeObj
def
button(source, side, text, command=None):
storeObj = Button(source, text=text, command=command)
storeObj.pack(side= side, expand = YES, fill=BOTH)
return storeObj
class
app(Frame):
def __init__(self):
Frame.__init__(self)
self.option_add('*Font', 'arial 18 bold')
self.pack(expand = YES, fill
=BOTH)
self.master.title('Calculator')
display = StringVar()
Entry(self, relief=RIDGE,
textvariable=display,
justify= 'right'
, bd=10,bg= "powder blue").pack(side=TOP,
expand=YES, fill=BOTH)
for clearButton in (["C"]):
erase = iCalc( self, TOP)
for ichar in clearButton:
button(erase, LEFT, ichar, lambda
storeObj=display, q=ichar: storeObj.set(''))
for numButton in ("789/", "456*", "123-", "0.+"):
FunctionNum = iCalc( self, TOP)
for iEquals in numButton:
button(FunctionNum, LEFT, iEquals,
lambda
storeObj=display, q=iEquals: storeObj
.set( storeObj.get() + q))
EqualButton = iCalc( self, TOP)
for iEquals in "=":
if iEquals == '=':
btniEquals = button(EqualButton, LEFT,
iEquals)
btniEquals.bind( '<ButtonRelease-1>', lambda e,s=self,
storeObj=display: s.calc(storeObj), '+')
else:
btniEquals = button(EqualButton, LEFT,
iEquals,
lambda storeObj=display, s=' %s ' % iEquals: storeObj.set
( storeObj.get() + s))
def calc(self, display):
try:
display.set(eval(display.get()))
except:
display.set("ERROR")
if
__name__=='__main__':
app().mainloop() |
|
| | |
- Output:
 |
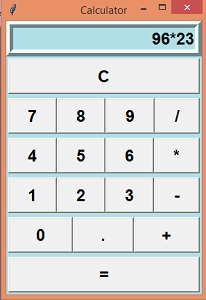 |
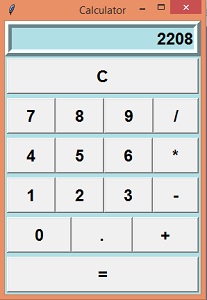 |
|
no data Entry, Empty |
data entry : 96*23 |
resultat: 96*23 = 2208 | |
| |
|
|
| | | | 3.2- Python Calculator, Design 2 |
|
- Python program, of tkinter Module to display Calculator Design 2
- Create a new Python project In Visual Studio 2019
- the
Microsoft Visual Studio (... or 2019) is
a powerful IDE for Python language
-
Open/Run Microsoft Visual Studio 2019
- To
view Python templates, search for python.
|
|
Select
the
Python Application template,
and select
Next. |
- Create a new Python project In Visual Studio 2019
On the Configure your new project
screen - (specify a name and
file location for the project, and then select
Create)
Project name: Pycalculator1
Location: C:\Users\...\source\repos
(default location for
Visual Studio 2019)
|
- The new project opens in Visual Studio 2019
- (Visual Studio 2019 Compiler - IDE, to compile Python
project / file )
- The
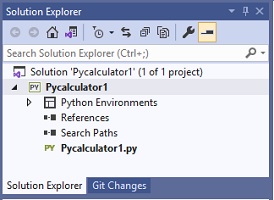
Visual Studio Solution Explorer window shows the
project structure
- Python
Project
Proprieties - Pycalculator1.
- Download Python
Project : Pycalculator1.zip - (12.7 KB zip file) Download
-
Project consist of One Python Form - ( Pycalculator1..py)
|
 | |
| Download Python
Project : Pycalculator1.zip - (12.7 KB zip file) Download |
- Source Code:
|
Download this
Source Code at python file:
Pycalculator1..py
- (4 KB python file)
download
|
|
Download this
Source Code at txt file: PyCalculatorText.txt - (3.6 KB txt file)
download
|
Continue
|
Python Code, to display Calculator desigm 2 - (Build a Python GUI Calculator) | |
|
|
| 1 |
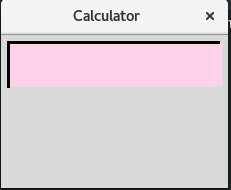
Introduction: |
| |
Visual Studio is a powerful Python IDE on Windows. Visual Studio provides open-source support for the Python language through the Python Development and Data Science workloads (Visual Studio 2017 and later)
|
| |
| 1.1- Need to Know |
There are things you need to be
comfortable with before starting this project. They include
- Python Basics (for loops, if/else statements, strings
etc..)
- Python Classes
- Basic knowledge of the Tkinter module.
You
can find the code for this project on github. But I’d
prefer you following along with me from
scratch. |
| 1.2- What should The Calculator
do/have? |
We are going to list
all of the features our calculator should have and use
them as a guide while building.The calculator
- should have A screen, for displaying numbers,
- Buttons with numbers on them.
- Should be able to add, subtract, multiply, divide
- should support decimals.
- should have a backspace button for clearing the
screen.
|
|
| |
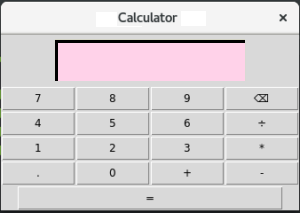
1.3 create step by step Pycalculator1.py - Python GUI Calculator file |
| |
The Code
step 1
Open an
empty file and save it as Pycalculator1.py and type this in it.
from tkinter import *

class Calculator:
    def __init__(self, master):
        self.master = master
        master.title("Python Calculator")


root = Tk()
my_gui = Calculator(root)
root.mainloop()
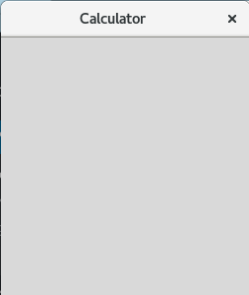
If you run the program now, you get this
|
|
|
| |
|
Step - 2
We are going to create our screen in this step.
from tkinter import *

class Calculator:
    def __init__(self, master):
        self.master = master
        master.title("Python Calculator")

        # create screen widget
        self.screen = Text(master, state='disabled', width=30, height=3,background="yellow", foreground="blue")

        # position screen in window
        self.screen.grid(row=0,column=0,columnspan=4,padx=5,pady=5)
        self.screen.configure(state='normal')

        # initialize screen value as empty
        self.equation = ''


root = Tk()
my_gui = Calculator(root)
root.mainloop()
to Add our screen in this step.
|
|
|
|
|
| |
|
Step 3-
Our next goal, is to add buttons to the calculator board
from tkinter import *

class Calculator:
    def __init__(self, master):
        self.master = master
        master.title("Python Calculator")

        # create screen widget
        self.screen = Text(master, state='disabled', width=30, height=3,background="yellow", foreground="blue")

        # position screen in window
        self.screen.grid(row=0,column=0,columnspan=4,padx=5,pady=5)
        self.screen.configure(state='normal')

        # initialize screen value as empty
        self.equation = ''

        # create buttons using method createButton
        b1 =  self.createButton(7)
        b2 = self.createButton(8)
        b3 = self.createButton(9)
        b4 = self.createButton(u"\u232B",None)
        b5 = self.createButton(4)
        b6 = self.createButton(5)
        b7 = self.createButton(6)
        b8 = self.createButton(u"\u00F7")
        b9 = self.createButton(1)
        b10 = self.createButton(2)
        b11 = self.createButton(3)
        b12 = self.createButton('*')
        b13 = self.createButton('.')
        b14 = self.createButton(0)
        b15 = self.createButton('+')
        b16 = self.createButton('-')
        b17 = self.createButton('=',None,34)

        # buttons stored in list
        buttons = [b1,b2,b3,b4,b5,b6,b7,b8,b9,b10,b11,b12,b13,b14,b15,b16,b17]

        # intialize counter
        count = 0
        # arrange buttons with grid manager
        for row in range(1,5):
            for column in range(4):
                buttons[count].grid(row=row,column=column)
                count += 1
        # arrange last button '=' at the bottom
        buttons[16].grid(row=5,column=0,columnspan=4)

    def createButton(self,val,write=True,width=7):
        # this function creates a button, and takes one compulsory argument, the value that should be on the button

        return Button(self.master, text=val,command = lambda: self.click(val,write), width=width)

root = Tk()
my_gui = Calculator(root)
root.mainloop()
Our calculator is now with buttons
|
|
|
| |
|
Step -4
We are about to make our
buttons less useless. Remember the value self.click that we passed
to the command attribute in method createButton?
from tkinter import *

class Calculator:
    def __init__(self, master):
        self.master = master
        master.title("Python Calculator")

        # create screen widget
        self.screen = Text(master, state='disabled', width=30, height=3,background="yellow", foreground="blue")

        # position screen in window
        self.screen.grid(row=0,column=0,columnspan=4,padx=5,pady=5)
        self.screen.configure(state='normal')

        # initialize screen value as empty
        self.equation = ''

        # create buttons using method createButton
        b1 =  self.createButton(7)
        b2 = self.createButton(8)
        b3 = self.createButton(9)
        b4 = self.createButton(u"\u232B",None)
        b5 = self.createButton(4)
        b6 = self.createButton(5)
        b7 = self.createButton(6)
        b8 = self.createButton(u"\u00F7")
        b9 = self.createButton(1)
        b10 = self.createButton(2)
        b11 = self.createButton(3)
        b12 = self.createButton('*')
        b13 = self.createButton('.')
        b14 = self.createButton(0)
        b15 = self.createButton('+')
        b16 = self.createButton('-')
        b17 = self.createButton('=',None,34)

        # buttons stored in list
        buttons = [b1,b2,b3,b4,b5,b6,b7,b8,b9,b10,b11,b12,b13,b14,b15,b16,b17]

        # intialize counter
        count = 0
        # arrange buttons with grid manager
        for row in range(1,5):
            for column in range(4):
                buttons[count].grid(row=row,column=column)
                count += 1
        # arrange last button '=' at the bottom
        buttons[16].grid(row=5,column=0,columnspan=4)

    def createButton(self,val,write=True,width=7):
        # this function creates a button, and takes one compulsory argument, the value that should be on the button

        return Button(self.master, text=val,command = lambda: self.click(val,write), width=width)

    def click(self,text,write):
        # this function handles what happens when you click a button
        # 'write' argument if True means the value 'val' should be written on screen, if None, should not be written on screen
        if write == None:

            #only evaluate code when there is an equation to be evaluated
            if text == '=' and self.equation:
                # replace the unicode value of division ./.with python division symbol / using regex
                self.equation= re.sub(u"\u00F7", '/', self.equation)
                print(self.equation)
                answer = str(eval(self.equation))
                self.clear_screen()
                self.insert_screen(answer,newline=True)
            elif text == u"\u232B":
                self.clear_screen()


        else:
            # add text to screen
            self.insert_screen(text)


    def clear_screen(self):
        #to clear screen
        #set equation to empty before deleting screen
        self.equation = ''
        self.screen.configure(state='normal')
        self.screen.delete('1.0', END)

    def insert_screen(self, value,newline=False):
        self.screen.configure(state='normal')
        self.screen.insert(END,value)
        # record every value inserted in screen
        self.equation += str(value)
        self.screen.configure(state ='disabled')

root = Tk()
#-----Form, Center of Screen-- window_width = 255 window_height = 190 # get the screen size of your computer [width and height using the root object as foolows] screen_width = root.winfo_screenwidth() screen_height = root.winfo_screenheight() # Get the window position from the top dynamically as well as position from left or right as follows position_top = int(screen_height/2 -window_height/2) position_right = int(screen_width / 2 - window_width/2) # this is the line that will center your window root.geometry( f'{window_width}x{window_height}+{position_right}+{position_top}')#-------------- my_gui = Calculator(root)
root.mainloop()
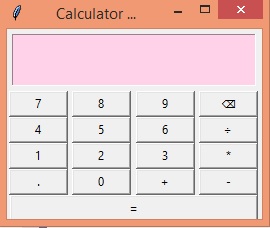
Our calculator is now |
|
|
| |
|
| |
|
|
| | |
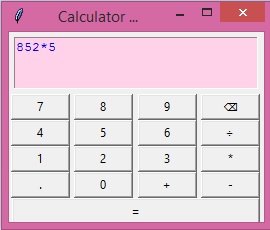
- Output:
|
|
 |
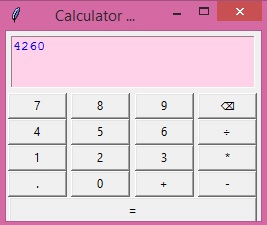 |
|
no data Entry, Empty |
data entry : 852*5 |
resultat: 852*5 = 4260 | |
| |
|
|
|
| |
|
| |
|
|
4- |
Python, Program
to display multi Forms -
Py-tkinter11 |
| |
|
- Python program, of tkinter Module to
display rectangle design
- Create a new Python project In Visual Studio 2019
- the
Microsoft Visual Studio (... or 2019) is
a powerful IDE for Python language
-
Open/Run Microsoft Visual Studio 2019
- To
view Python templates, search for python.
|
|
Select
the
Python Application template,
and select
Next. |
- Create a new Python project In Visual Studio 2019
On the Configure your new project
screen - (specify a name and
file location for the project, and then select
Create)
Project name:
Py-tkinter11
Location: C:\Users\...\source\repos
(default location for
Visual Studio 2019)
|
- The new project opens in Visual Studio 2019
- (Visual Studio 2019 Compiler - IDE, to compile Python
project / file )
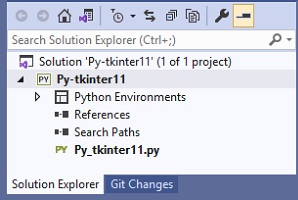
- The
Visual Studio Solution Explorer window shows the
project structure
- Python
Project
Proprieties -
Py-tkinter11.
- Projct
Folder:
C:\Users\...\source\repos\Py-tkinter11
- Startup
File:
Py-tkinter11.py
- Project
file: Py-tkinter11.sln
|
- Download Python
Project : Py-tkinter11.zip - (8.6KB zip file)
Download
-
Project consist of:
One Python Form - (Py-tkinter11.py)
- this
python Form (
Py-tkinter11.py) to be create 8 output Forms
|
 | |
|
Download Python
Project : Py-tkinter11.zip - (8.6
KB zip file)
Download |
- Source Code:
|
Download
this Source Code at python file :Py-tkinter11.py -
(6.2 KB Python file)
download
|
|
Continue
|
Python Code,
to display multi Forms -
Py-tkinter11.py | |
|
|
| |
from
tkinter
import *
root= Tk()
#-----Form, Center of Screen--
window_width = 250
window_height = 190
# get the screen size of your computer [width
and height using the root object as foolows]
screen_width
= root.winfo_screenwidth()
screen_height
= root.winfo_screenheight()
# Get the window position from the top
dynamically as well as position from left or
right as follows
position_top =
int(screen_height/2
-window_height/2)
position_right =
int(screen_width
/ 2 - window_width/2)
# this is the line that will center your
window
root.geometry( f'{window_width}x{window_height}+{position_right}+{position_top}')
#--------------
root.title( "Log,
Books ...")
#--Log In--------------
def
login():
root2= Toplevel(root)
root2.title( "Log
...")
l= Label(root2,text="User
name: ").grid(row=1,column=0,sticky=E)
e= Entry(root2,width=15).grid(row=1,column=1)
l1= Label(root2,text="Password:
").grid(row=3,column=0,sticky=E)
e= Entry(root2,show="*",width=15).grid(row=3,column=1)
b3= Button(root2,text="
Log In ",command=choice).grid(row=4,column=0,sticky=E)
b4= Button(root2,text="
Log Up ",command=newuser).grid(row=4,column=1,sticky=E)
#--Log Up / New User--------------
def
newuser():
root3= Toplevel(root)
root3.title( "Log
Up ...")
l2= Label(root3,text="Name:
").grid(row=1,column=1,sticky=E)
e2= Entry(root3,width=15).grid(row=1,column=2)
l5= Label(root3,text="Gender:
").grid(row=2,column=1,sticky=E)
var =
IntVar()
r1= Radiobutton(root3,text="Male",
variable=var, value=1).grid(row=2,column=2)
r2= Radiobutton(root3,text="Female",
variable=var, value=2).grid(row=2,column=3)
l3= Label(root3,text="Mobile
No: ").grid(row=3,column=1,sticky=E)
e4= Entry(root3,width=15).grid(row=3,column=2)
l4= Label(root3,text="Email
Id: ").grid(row=4,column=1,sticky=E)
e5= Entry(root3,width=15).grid(row=4,column=2)
b5= Button(root3,text="Submit",command=choice).grid(row=5,column=2,padx=5)
b6= Button(root3,text="Close
",command=root3.destroy).grid(row=5,column=3,padx=5)
#--Choice--------------
def
choice():
root6= Toplevel(root)
root6.title( "Books
...")
l61= Label(root6,text="Submit
Book: ").grid(row=1,column=1,sticky=E)
b5= Button(root6,text="Submit
Book",command=subbook).grid(row=1,column=2)
l62= Label(root6,text="Request
Book: ").grid(row=3,column=1,sticky=E)
b8= Button(root6,text="Request
Book",command=reqbook).grid(row=3,column=2)
#--Submit-------------
def
subbook():
root5= Toplevel(root)
root5.title( "Submit
...")
result2Str=
StringVar()
result6Str= StringVar()
result2Str.set( "In
$ ")
result6Str.set( "")
l= Label(root5,text="User
name: ").grid(row=2,column=1,sticky=E)
e= Entry(root5,width=15).grid(row=2,column=2)
resultLabel =
Label(root5,textvariable=result2Str).grid(row=5,column=2)
resultLabel =
Label(root5,textvariable=result6Str).grid(row=7,column=2)
l= Label(root5,text="Book
name :").grid(row=3,column=1,sticky=E)
def price(self):
s= str(variable.get())
if(s=="c"
or s=="c++"):
result2Str.set( "In
$ 1000")
elif(s=="Dbms"):
result2Str.set( "In
$ 750")
else:
result2Str.set( "In
$ 500")
ll= Label(root5,text="Book
Price :").grid(row=3,column=1,sticky=E)
variable= StringVar(root5)
variable.set( "C")
w= OptionMenu(root5,variable,"Data
structures","Dbms","Python","c++","c",command=price).grid(row=3,column=2)
def sub():
result6Str.set( "Submissional
Successfull")
ls= Label(root5,text="Resultat:
").grid(row=6,column=1,sticky=E)
b1= Button(root5,text="Submit",command=sub).grid(row=6,column=2,padx=50)
#--Exit----------------
def
destroy():
root.destroy()
# Request ...
def
reqbook():
root6= Toplevel(root)
root6.title( "Request
...")
result3Str= StringVar()
result4Str= StringVar()
result3Str.set( "")
result4Str.set( "")
l= Label(root6,text="User
name: ").grid(row=2,column=1,pady=5)
e= Entry(root6,width=15).grid(row=2,column=2)
result3Label =
Label(root6,textvariable=result3Str).grid(row=4,column=2)
result4Label =
Label(root6,textvariable=result4Str).grid(row=7,column=2)
l= Label(root6,text="Book
name :").grid(row=2,column=1,pady=5)
def price(self):
s= str(variable.get())
if(s=="c"
or s=="c++"):
result3Str.set( "In
$ 1000")
elif(s=="Dbms"):
result3Str.set( "In
$ 750")
else:
result3Str.set( "In
$ 500")
ll1= Label(root6,text="Book
Price :").grid(row=3,column=1,sticky=E)
variable= StringVar(root6)
w= OptionMenu(root6,variable,"Data
structures","Dbms","Python","c++","c",command=price).grid(row=3,column=2)
variable.set( "c")
def
order():
result4Str.set( "Ordered
Successfully")
ls= Label(root6,text="Resultat:
").grid(row=5,column=1,sticky=E)
b1= Button(root6,text="Order",command=order).grid(row=5,column=2,padx=50)
label01 =
Label(root,
font = ('Times
New Roman',14,'bold'),
fg =
"Maroon",
text ="")
label01.grid(row=0,column=1,sticky=W)
label =
Label(root,
font = ('Times
New Roman',10),
text ="Log
In : ")
label.grid(row=1,column=0,sticky=E)
b= Button(root,text="Log
In",command=login).grid(row=1,column=1,sticky=E)
label1 =
Label(root,
font = ('Times
New Roman',10),
text ="Log
Up : ")
label1.grid(row=2,column=0,sticky=E)
b1= Button(root,text="Log
Up",command=newuser).grid(row=2,column=1,sticky=E)
label02 =
Label(root,
font = ('Times
New Roman',10),
text ="")
label02.grid(row=3,column=0,sticky=E)
label2 =
Label(root,
font = ('Times
New Roman',10,'bold'),
fg =
"Navy",
text ="
Available Books : ")
label2.grid(row=4,column=0,sticky=E)
b2= Button(root,
font = ('Times
New Roman',10,'bold'),
fg =
"Navy",text="Available
Books",command=reqbook).grid(row=4,column=1,sticky=E)
label03 =
Label(root,
font = ('Times
New Roman',10),
text ="")
label03.grid(row=5,column=0,sticky=E)
label3 =
Label(root,
font = ('Times
New Roman',10,'bold'),
fg =
"red",
text ="Exit
: ")
label3.grid(row=6,column=0,sticky=E)
exit_btn =
Button(root,
font = ('Times
New Roman',10,'bold'),
text="
Exit ", fg
=
"red",
command = destroy)
exit_btn.grid(row=6,column=1,sticky=E)
root=mainloop() |
|
| | |
- Output :
|
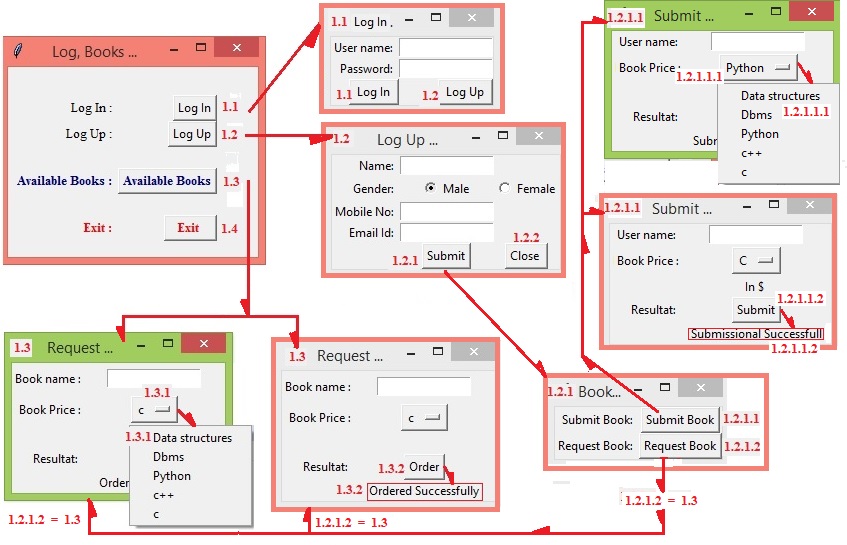 |
|
- Py-tkinter1 , 8 Forms, multi
Forms, multi Links |
|
| | |
|
| |
|
| 5- |
Python,
ListBox Operations |
|
|
| |
|
- Python program of tkinter
Module, ListBox Operations
- Create a new Python project In Visual Studio 2019
- the
Microsoft Visual Studio (... or 2019) is
a powerful IDE for Python language
-
Open/Run Microsoft Visual Studio 2019
- To
view Python templates, search for python.
|
|
Select
the
Python Application template,
and select
Next. |
- Create a new Python project In Visual Studio 2019
On the Configure your new project
screen - (specify a name and
file location for the project, and then select
Create)
Project name:
Py_listFunct
Location: C:\Users\...\source\repos
(default location for
Visual Studio 2019)
|
- The new project opens in Visual Studio 2019
- (Visual Studio 2019 Compiler - IDE, to compile Python
project / file )
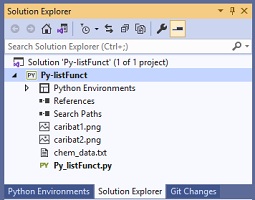
- The
Visual Studio Solution Explorer window shows the
project structure
- Python
Project Propeieties -
Py_listFunct.
- Projct
Folder:
C:\Users\...\source\repos\Py-listFunct
- Startup
File: Py_listFunct.py
- Project
file: Py_listFunct.sln
|
- Download Python
Project : Py_listFunct.zip - (186
KB zip file)
Download
-
Project consist of:
1- One Python Form - (Py_listFunct.py )
2- png picture files - images
(caribat1.png+ caribat2.png)
3- txt file - chem_data.txt
- show
Images & Display txt file at Form
|
 | |
|
Download Python
Project : Py_listFunct.zip - (186
KB zip file)
Download |
- Source Code:
|
Download this Source Code at
python file: Py_listFunct.py - (6.12 KB
Python file)
download
|
|
Download this
Source Code at txt file: chem_data.txt - (0.2
KB txt file)
download
|
|
Continue
|
Python Code,
to display ListBox Operations | |
|
|
| |
| |
|
#
Python, ListBox Functions + 2 images # load a
Tkinter listbox with data lines from a file,
# sort data lines, select a data line,
display the data line,
# edit the data line, update listbox with the
edited data line
# add/delete a data line, save the updated
listbox to a data file
from
tkinter
import *
import
tkinter
as
tk
# gives tk namespace
def
add_item():
"""
add the text in the Entry widget to the end
of the listbox
"""
listbox1.insert(END, enter1.get())
def
delete_item():
"""
delete a selected line from the listbox
"""
try:
#
get selected line index
index = listbox1.curselection()[0]
listbox1.delete(index)
except
IndexError:
pass
def
get_list(event):
"""
function to read the listbox selection
and put the result in an entry widget
"""
#
get selected line index
index = listbox1.curselection()[0]
#
get the line's text
seltext =
listbox1.get(index)
#
delete previous text in enter1
enter1.delete(0, 50)
#
now display the selected text
enter1.insert(0,
seltext)
def
set_list(event):
"""
insert an edited line from the entry widget
back into the listbox
"""
try:
index = listbox1.curselection()[0]
#
delete old listbox line
listbox1.delete(index)
except
IndexError:
index = END
#
insert edited item back into listbox1 at index
listbox1.insert(index, enter1.get())
def
sort_list():
"""
function to sort listbox items case
insensitive
"""
temp_list =
list(listbox1.get(0,
END))
temp_list.sort(key= str.lower)
#
delete contents of present listbox
listbox1.delete(0, END)
#
load listbox with sorted data
for item
in
temp_list:
listbox1.insert(END, item)
def
save_list():
"""
save the current listbox contents to a file
"""
#
get a list of listbox lines
temp_list =
list(listbox1.get(0,
END))
#
add a trailing newline char to each line
temp_list = [ chem
+
'\n'
for
chem
in
temp_list]
#
give the file a different name
fout = open( "chem_data2.txt",
"w")
fout.writelines(temp_list)
fout.close()
# create the sample data file
str1 =
"""ethyl alcohol
ethanol
ethyl hydroxide
hydroxyethane
methyl hydroxymethane
ethoxy hydride
gin
bourbon
rum
schnaps
"""
fout = open( "chem_data.txt",
"w")
fout.write(str1)
fout.close()
# read the data file into a list
fin = open( "chem_data.txt",
"r")
chem_list = fin.readlines()
fin.close()
# strip the trailing newline char
chem_list = [ chem.rstrip()
for
chem
in
chem_list]
root =
tk.Tk()
root.title( "ListBox
Operations")
#---------Form, Center of Screen--
window_width = 475
window_height = 370
# get the screen size of your computer [width
and height using the root object as foolows]
screen_width
= root.winfo_screenwidth()
screen_height
= root.winfo_screenheight()
# Get the window position from the top
dynamically as well as position from left or
right as follows
position_top =
int(screen_height/2
-window_height/2)
position_right =
int(screen_width
/ 2 - window_width/2)
# this is the line that will center your
window
root.geometry( f'{window_width}x{window_height}+{position_right}+{position_top}')
root.configure(bg= 'silver')
# Exit GUI cleanly
def
_quit():
root.quit()
root.destroy()
# Creating a Menu Bar
menu_bar =
Menu(root)
root.config(menu=menu_bar)
menu_bar.add_cascade(label= "Exit",
command=_quit)
# create the listbox
#1-create Frame
Frame2 =
Frame(root,
borderwidth=2,bg="gray")
Frame2.grid(row=1,column=0, pady=7)
#2- Vertical & Horizontal scrollbars to the
listbox
yscroll =
Scrollbar(Frame2,
orient=VERTICAL)
yscroll.pack(side=RIGHT, fill=Y)
xscroll =
Scrollbar(Frame2,
orient=HORIZONTAL)
xscroll.pack(side=BOTTOM, fill=X)
listbox1 =
Listbox(Frame2,
width=30, height=10, yscrollcommand=yscroll,
xscrollcommand=xscroll)
listbox1.pack(expand= True,
fill=Y)
listbox1.configure(yscrollcommand=yscroll.set,
xscrollcommand=xscroll.set)
yscroll.config(command=listbox1.yview)
xscroll.config(command=listbox1.xview)
# use entry widget to display/edit selection
enter1 =
Entry(root,
width=40, bg='yellow',
borderwidth=2)
enter1.insert(0,
'Click on an item in the listbox - (Entry)')
enter1.grid(row=3, column=0, sticky= N, pady=5,
padx=4)
# pressing the return key will update edited
line
enter1.bind( '<Return>',
set_list)
# or double click left mouse button to update
line
enter1.bind( '<Double-1>',
set_list)
#1-create Frame
Frame2 =
Frame(root,
borderwidth=2,bg="gray")
Frame2.grid(row=1,column=3)
# button to sort listbox
button1 =
Button(Frame2,
text='Sort
the listbox',
width=20, font=("Times",
10), command=sort_list)
button1.grid(row=1, column=2, sticky= N, padx=25,
pady=10)
# button to save the listbox's data lines to
a file
button2 =
Button(Frame2,
text='Save
lines to file',
width=20, font=("Times",
10), command=save_list)
button2.grid(row=2, column=2, sticky= N, padx=25,
pady=10)
# button to add a line to the listbox
button3 =
Button(Frame2,
text='Add
entry text to listbox',
width=20, font=("Times",
10), command=add_item)
button3.grid(row=3, column=2, sticky= N, padx=25,
pady=10)
# button to delete a line from listbox
button4 =
Button(Frame2,
text='Delete
selected line',
width=20, font=("Times",
10), command=delete_item)
button4.grid(row=4, column=2, sticky= N, padx=25,
pady=10)
#1-create Frame
Frame3a =
Frame(root,
borderwidth=2,bg="navy")
Frame3a.grid(row=5,column=0, pady = 10)
# show picture
img1= PhotoImage(file
=
"caribat1.png")
Label (Frame3a,image
= img1).pack(anchor =
'center')
Frame3b =
Frame(root,
borderwidth=2,bg="navy")
Frame3b.grid(row=5,column=3, pady= 10)
# show picture
img2= PhotoImage(file
=
"caribat2.png")
Label (Frame3b,image
= img2).pack(anchor =
'center')
# load the listbox with data
for
item
in
chem_list:
listbox1.insert(END, item)
# left mouse click on a list item to display
selection
listbox1.bind( '<ButtonRelease-1>',
get_list)
root.mainloop() |
| |
|
|
| | |
- Output:
|
| | |
|
| |
|
| 6- |
Python,
Mini Restaurant Bill
|
| |
|
|
- Python program, of tkinter and random
Module to display Mini Restaurent Bill
- Create a new Python project In Visual Studio 2019
- the
Microsoft Visual Studio (... or 2019) is
a powerful IDE for Python language
-
Open/Run Microsoft Visual Studio 2019
- To
view Python templates, search for python.
|
|
Select
the
Python Application template,
and select
Next. |
- Create a new Python project In Visual Studio 2019
On the Configure your new project
screen - (specify a name and
file location for the project, and then select
Create)
Project name:
pyt_restaurent
Location: C:\Users\...\source\repos
(default location for
Visual Studio 2019)
|
- The new project opens in Visual Studio 2019
- (Visual Studio 2019 Compiler - IDE, to compile Python
project / file )
- The
Visual Studio Solution Explorer window shows the
project structure
- Python
Project Properieties -
pyt_restaurent
- Projct
Folder:
C:\Users\...\source\repos\pyt_restaurent
- Startup
File:
pyt_restaurent.py
- Project
file: pyt_restaurent.sln
|
- Download Python
Project : pyt_restaurent.zip - (28.0
KB zip file)
Download
-
Project consist of:
3 Python Forms - (pyt_restaurent.py + restaurant_management_system.py +
price.py
and 1 file txt (value.txt) used to stores Data
- Login
Details:
Username: chk
Password: 2345
|
 | |
|
Download Python
Project : pyt_restaurent.zip - (28.0
KB zip file)
Download |
- Source Code:
| |
1- |
Download this
Source Code at python file: pyt_restaurent.py - (1.74
KB Python file)
download
|
| |
2- |
Download this
Source Code at python file:
restaurant_management_system.py - (13.3
KB Python file)
download
|
| |
3- |
Download this
Source Code at python file: price.py - (7.5
KB Python file)
download
|
| |
4- |
Download this
Source Code at txt file: value.txt - (0.39
KB txt file)
download
|
|
|
Continue
|
3 Python Code
files, to display Mini Restaurant Bill Project | |
|
|
| 1- |
pyt_restaurent.py
from
tkinter
import*
import
tkinter.messagebox
root1 =
Tk()
#---------Form, Center of Screen--
window_width = 250
window_height = 150
# get the screen size of your computer [width
and height using the root object as foolows]
screen_width
= root1.winfo_screenwidth()
screen_height
= root1.winfo_screenheight()
# Get the window position from the top
dynamically as well as position from left or
right as follows
position_top =
int(screen_height/2
-window_height/2)
position_right =
int(screen_width
/ 2 - window_width/2)
# this is the line that will center your
window
root1.geometry( f'{window_width}x{window_height}+{position_right}+{position_top}')
#--------------
root1.title( "Login
Page")
name_inp =
StringVar()
password_inp =
StringVar()
def
enter():
if
name_inp.get() ==
"chk"
and
password_inp.get() ==
"2345":
root1.destroy()
import
restaurant_management_system
else:
tkinter.messagebox.showinfo('Error','Authentication
Failed')
name_inp.set( "")
password_inp.set( "")
def
destroy():
root1.destroy()
label =
Label(root1,
font = ('Times
New Roman',32,'bold'),
text ="Login",
fg =
"steel blue",
bd = 10, anchor =
'w')
label.grid(row=0,column=3)
label1 =
Label(root1,
text="Username=chk")
label2 =
Label(root1,
font =('Times
New Roman',10,'bold'),text="Pin=2345")
entry1 =
Entry(root1,
textvariable = name_inp)
entry2 =
Entry(root1,
textvariable = password_inp)
label1.grid(row=1,column=2,sticky=E)
label2.grid(row=2,column=2,sticky=E)
entry1.grid(row=1,column=3)
entry2.grid(row=2,column=3)
enter_btn =
Button(root1,
text="
Enter ",
command= enter)
enter_btn.grid(row=4, column=3,sticky=W)
exit_btn =
Button(root1,
padx= 1, text="
Exit ",
command= destroy)
exit_btn.grid(row=4,column=3,sticky=E)
entry1.focus_set()
root1.mainloop() |
| |
|
| 2- |
restaurant_management_system.py
from tkinter import*
import tkinter.messagebox
import time
import random
operator = ""
root = Tk()
#### creating window, Center of Screen, its
geometry ######
window_width = 1000
window_height = 600
# get the screen size of your computer [width
and height using the root object as foolows]
screen_width = root.winfo_screenwidth()
screen_height = root.winfo_screenheight()
# Get the window position from the top
dynamically as well as position from left or
right as follows
position_top = int(screen_height/2 -
window_height/2)
position_right = int(screen_width / 2 -
window_width/2)
# this is the line that will center your window
root.geometry(f'{window_width}x{window_height}+{position_right}+{position_top}')
#--------------
root.title("Restaurant Bill Calculator")
##Menu
def enter01():
root.quit #.destroy()
import restaurant_management_system
def bck():
root.destroy()
import price
# Creating Menubar
menubar = Menu(root)
# Adding Operation Menu and commands
Operation = Menu(menubar, tearoff = 0)
menubar.add_cascade(label ='Operation', menu =
Operation)
Operation.add_command(label ='Restaurant Bill',
command = None)
Operation.add_separator()
Operation.add_command(label ='Change Price',
command = bck)
#Operation.add_separator()
# Adding Edit Menu and commands
Exit = Menu(menubar, tearoff = 0)
menubar.add_command(label ='Exit', command =
root.destroy)
# display Menu
root.config(menu = menubar)
#### creating Frame ######
top = Frame(root, bd = 3, width = 900, height =
40)
#top = Frame(root, width = 1600, height = 50,
relief = SUNKEN)
top.pack(side = TOP)
left = Frame(root, bd = 3, width = 400, height =
500)
left.pack(side = LEFT)
right = Frame(root, bg ="silver", bd = 10, width
= 500, height = 500) #3
right.pack(side = RIGHT)
##### creating label of title and time ###
label_info = Label(top, font = ('Times New
Roman',20,'bold'), text ="Python, Restaurant
Bill Calculator - $", fg = "steel blue", bd =
10, anchor = 'w')
label_info.grid(row = 0, column = 0)
local_time =
time.asctime(time.localtime(time.time()))
label_info = Label(top, font = ('Times New
Roman',12,'bold'), text = local_time, fg =
"steel blue", bd = 10, anchor = 'w')
label_info.grid(row = 1, column = 0)
######## creating calculator #######
#--------------------------
txt_inp = StringVar()
def btn_click(number):
global operator
operator = operator+ str(number)
txt_inp.set(operator)
def fun_clear():
global operator
operator = ""
txt_inp.set(operator)
def calculate():
global operator
try:
sumup = str(eval(operator))
except Exception as e:
tkinter.messagebox.showinfo('Error','Incorrect
Input')
sumup = 0
fun_clear()
txt_inp.set(sumup)
operator = ""
txt = Entry(right, font = ('Times New
Roman',12,'bold'), textvariable = txt_inp, bd =
30, insertwidth = 4, bg = "powderblue", justify
= 'right')
txt.grid(columnspan = 4)
#=========first row button=========
btn7 = Button(right, padx= 16, pady=16, bd= 7,
fg= "black", font= ('Times New
Roman',12,'bold'), text="7", bg="powder blue",
command=lambda: btn_click(7))
btn7.grid(row= 2, column= 0)
btn8 = Button(right, padx= 16, pady=16, bd= 7,
fg= "black", font= ('Times New
Roman',12,'bold'), text="8", bg="powder blue",
command=lambda: btn_click(8))
btn8.grid(row= 2, column= 1)
btn9 = Button(right, padx= 16, pady=16, bd= 7,
fg= "black", font= ('Times New
Roman',12,'bold'), text="9", bg="powder blue",
command=lambda: btn_click(9))
btn9.grid(row= 2, column= 2)
plus = Button(right, padx= 16, pady=16, bd= 7,
fg= "black", font= ('Times New
Roman',12,'bold'), text="+", bg="powder blue",
command=lambda: btn_click("+"))
plus.grid(row= 2, column= 3)
#=========second row button=========
btn4 = Button(right, padx= 16, pady=16, bd= 7,
fg= "black", font= ('Times New
Roman',12,'bold'), text="4", bg="powder blue",
command=lambda: btn_click(4))
btn4.grid(row= 3, column= 0)
btn5 = Button(right, padx= 16, pady=16, bd= 7,
fg= "black", font= ('Times New
Roman',12,'bold'), text="5", bg="powder blue",
command=lambda: btn_click(5))
btn5.grid(row= 3, column= 1)
btn6 = Button(right, padx= 16, pady=16, bd= 7,
fg= "black", font= ('Times New
Roman',12,'bold'), text="6", bg="powder blue",
command=lambda: btn_click(6))
btn6.grid(row= 3, column= 2)
minus = Button(right, padx= 16, pady=16, bd= 7,
fg= "black", font= ('Times New
Roman',12,'bold'), text="-", bg="powder blue",
command=lambda: btn_click("-"))
minus.grid(row= 3, column= 3)
#=========third row button=========
btn1 = Button(right, padx= 16, pady=16, bd= 7,
fg= "black", font= ('Times New
Roman',12,'bold'), text="1", bg="powder blue",
command=lambda: btn_click(1))
btn1.grid(row= 4, column= 0)
btn2 = Button(right, padx= 16, pady=16, bd= 7,
fg= "black", font= ('Times New
Roman',12,'bold'), text="2", bg="powder blue",
command=lambda: btn_click(2))
btn2.grid(row= 4, column= 1)
btn3 = Button(right, padx= 16, pady=16, bd= 7,
fg= "black", font= ('Times New
Roman',12,'bold'), text="3", bg="powder blue",
command=lambda: btn_click(3))
btn3.grid(row= 4, column= 2)
multiply = Button(right, padx= 16, pady=16, bd=
7, fg= "black", font= ('Times New
Roman',12,'bold'), text="*", bg="powder blue",
command=lambda: btn_click("*"))
multiply.grid(row= 4, column= 3)
#=========fourth row button=========
btn0 = Button(right, padx= 16, pady=16, bd= 7,
fg= "black", font= ('Times New
Roman',12,'bold'), text="0", bg="powder blue",
command=lambda: btn_click(0))
btn0.grid(row= 5, column= 0)
btn_clear = Button(right, padx= 16, pady=16, bd=
7, fg= "black", font= ('Times New
Roman',12,'bold'), text="C", bg="powder
blue",command=fun_clear)
btn_clear.grid(row= 5, column= 1)
btn_equal = Button(right, padx= 16, pady=16, bd=
7, fg= "black", font= ('Times New
Roman',12,'bold'), text="=", bg="powder
blue",command= calculate)
btn_equal.grid(row= 5, column= 2)
division = Button(right, padx= 16, pady=16, bd=
7, fg= "black", font= ('Times New
Roman',12,'bold'), text="/", bg="powder blue",
command=lambda: btn_click("/"))
division.grid(row= 5, column= 3)
#------------------------------
############now on left frame enter menu
####################################################################
rand = StringVar()
fries_inp = StringVar()
Sandwich_inp = StringVar()
burger_inp = StringVar()
drinks_inp = StringVar()
total_inp = StringVar()
subtotal_inp = StringVar()
services_inp = StringVar()
tax_inp = StringVar()
cost_inp = StringVar()
Pasta_inp = StringVar()
Tacos_inp = StringVar()
def qexit():
root.destroy()
def ref():
f1 = open('value.txt','r')
line = f1.readlines()
fries_p = float(line[0])
Sandwich_p = float(line[1])
burger_p = float(line[2])
drinks_p = float(line[3])
Pasta_p = float(line[4])
Tacos_p = float(line[5])
f1.close()
x = random.randint(23133,33344)
random_ref = str(x)
rand.set(random_ref)
try:
if fries_inp.get() == "":
CoF = 0
else:
CoF = float(fries_inp.get())*fries_p
except Exception as e:
tkinter.messagebox.showinfo('Error','Incorrect
Input')
fries_inp.set("")
try:
if Sandwich_inp.get() == "":
CoS = 0
else:
CoS = float(Sandwich_inp.get())*Sandwich_p
except Exception as e:
tkinter.messagebox.showinfo('Error','Incorrect
Input')
Sandwich_inp.set("")
try:
if burger_inp.get() == "":
CoB = 0
else:
CoB = float(burger_inp.get())*burger_p
except Exception as e:
tkinter.messagebox.showinfo('Error','Incorrect
Input')
burger_inp.set("")
try:
if drinks_inp.get() == "":
CoD = 0
else:
CoD = float(drinks_inp.get())*drinks_p
except Exception as e:
tkinter.messagebox.showinfo('Error','Incorrect
Input')
drinks_inp.set("")
try:
if Pasta_inp.get() == "":
CoP = 0
else:
CoP = float(Pasta_inp.get())*Pasta_p
except Exception as e:
tkinter.messagebox.showinfo('Error','Incorrect
Input')
Pasta_inp.set("")
try:
if Tacos_inp.get() == "":
CoC = 0
else:
CoC = float(Tacos_inp.get())*Tacos_p
except Exception as e:
tkinter.messagebox.showinfo('Error','Incorrect
Input')
Tacos_inp.set("")
CostOfMeal = (CoF+CoS+CoB+CoD+CoP+CoC)
PayTax = (CostOfMeal)*0.11
ServiceCharge = (CostOfMeal)*0.05
totalTax = PayTax + ServiceCharge
totalCost = (CostOfMeal + PayTax + ServiceCharge)
services_inp.set(str('%.2f' % (ServiceCharge)))
tax_inp.set(str('%.2f' % (PayTax)))
subtotal_inp.set(str('%.2f' % (CostOfMeal)))
total_inp.set(str('%.2f' % (totalCost)))
cost_inp.set(str('%.2f' % (totalTax)))
#def bck():
#root.destroy()
#import price
def reset():
rand.set("")
fries_inp.set("")
Sandwich_inp.set("")
burger_inp.set("")
drinks_inp.set("")
total_inp.set("")
subtotal_inp.set("")
services_inp.set("")
tax_inp.set("")
cost_inp.set("")
Pasta_inp.set("")
Tacos_inp.set("")
customer_number = Label(left, font=('Times New
Roman',10,'bold'),text = "Reference Id (auto)",
bd = 14, anchor = 'w')
customer_number.grid(row=0,column=0,sticky = E)
txt_customer = Entry(left,font=('Times New
Roman',10,'bold'), textvariable=rand, bd=10,
insertwidth =4,bg = "powder blue", justify
='right')
txt_customer.grid(row=0,column=1)
fries = Label(left, font=('Times New Roman',10,'bold'),text
= "Fries (quantity)", bd = 14, anchor = 'w' )
fries.grid(row=1,column=0,sticky = E)
txt_fries = Entry(left,font=('Times New
Roman',10,'bold'), textvariable=fries_inp, bd=10,
insertwidth =4,bg = "powder blue", justify
='right')
txt_fries.grid(row=1,column=1)
Sandwich = Label(left, font=('Times New
Roman',10,'bold'),text = "Sandwich (quantity)",
bd = 14, anchor = 'w' )
Sandwich.grid(row=2,column=0,sticky = E)
txt_Sandwich = Entry(left,font=('Times New
Roman',10,'bold'), textvariable=Sandwich_inp, bd=10,
insertwidth =4,bg = "powder blue", justify
='right')
txt_Sandwich.grid(row=2,column=1)
burger = Label(left, font=('Times New
Roman',10,'bold'),text = "Burger (quantity)", bd
= 14, anchor = 'w' )
burger.grid(row=3,column=0,sticky = E)
txt_burger = Entry(left,font=('Times New
Roman',10,'bold'), textvariable=burger_inp, bd=10,
insertwidth =0,bg = "powder blue", justify
='right')
txt_burger.grid(row=3,column=1)
drinks = Label(left, font=('Times New
Roman',10,'bold'),text = "Drinks (quantity)", bd
= 14, anchor = 'w' )
drinks.grid(row=4,column=0,sticky = E)
txt_drinks = Entry(left,font=('Times New
Roman',10,'bold'), textvariable=drinks_inp, bd=10,
insertwidth =4,bg = "powder blue", justify
='right')
txt_drinks.grid(row=4,column=1)
Pasta = Label(left, font=('Times New Roman',10,'bold'),text
= "Pasta (quantity)", bd = 14, anchor = 'w' )
Pasta.grid(row=5,column=0,sticky = E)
txt_Pasta = Entry(left,font=('Times New
Roman',10,'bold'), textvariable=Pasta_inp, bd=10,
insertwidth =4,bg = "powder blue", justify
='right')
txt_Pasta.grid(row=5,column=1)
Tacos = Label(left, font=('Times New Roman',10,'bold'),text
= "Tacos (quantity)", bd = 14, anchor = 'w' )
Tacos.grid(row=0,column=2,sticky = E)
txt_Tacos = Entry(left,font=('Times New
Roman',10,'bold'), textvariable=Tacos_inp, bd=10,
insertwidth =4,bg = "powder blue", justify
='right')
txt_Tacos.grid(row=0,column=3)
subtotal = Label(left, font=('Times New
Roman',10,'bold'),text = "Cost of Meal (auto)",
bd = 14, anchor = 'w' )
subtotal.grid(row=1,column=2,sticky = E)
txt_subtotal = Entry(left,font=('Times New
Roman',10,'bold'), textvariable=subtotal_inp, bd=10,
insertwidth =4,bg = "powder blue", justify
='right')
txt_subtotal.grid(row=1,column=3)
services = Label(left, font=('Times New
Roman',10,'bold'),text = "Service Charge
(auto)", bd = 14, anchor = 'w' )
services.grid(row=2,column=2,sticky = E)
txt_services = Entry(left,font=('Times New
Roman',10,'bold'), textvariable=services_inp, bd=10,
insertwidth =4,bg = "powder blue", justify
='right')
txt_services.grid(row=2,column=3)
tax = Label(left, font=('Times New Roman',10,'bold'),text
= "GST (auto)", bd = 14, anchor = 'w' )
tax.grid(row=3,column=2,sticky = E)
txt_tax = Entry(left,font=('Times New
Roman',10,'bold'), textvariable=tax_inp, bd=10,
insertwidth =4,bg = "powder blue", justify
='right')
txt_tax.grid(row=3,column=3)
cost = Label(left, font=('Times New Roman',10,'bold'),text
= "Total Tax (auto)", bd = 14, anchor = 'w' )
cost.grid(row=4,column=2,sticky = E)
txt_cost = Entry(left,font=('Times New
Roman',10,'bold'), textvariable=cost_inp, bd=10,
insertwidth =4,bg = "powder blue", justify
='right')
txt_cost.grid(row=4,column=3)
total = Label(left, font=('Times New Roman',10,'bold'),text
= "Total Cost (auto)", bd = 14, anchor = 'w' )
total.grid(row=5,column=2,sticky = E)
txt_total = Entry(left,font=('Times New
Roman',10,'bold'), textvariable=total_inp, bd=10,
insertwidth =4,bg = "powder blue", justify
='right')
txt_total.grid(row=5,column=3)
txt_fries.focus_force()
### right Frame Button ###########
btn_total = Button(left, padx= 8, pady= 2, bd=
4, fg= "black", font=('Times New
Roman',10,'bold'), width=12, text= "Total", bg=
"powder blue",command = ref)
btn_total.grid(row=8, column= 0,sticky=SE)
btn_reset = Button(left, padx= 8, pady= 2, bd=
4, fg= "black", font=('Times New
Roman',10,'bold'), width=12, text= "Reset", bg=
"powder blue",command = reset)
btn_reset.grid(row=7, column= 1,sticky= S)
btn_bck = Button(left, padx= 8, pady= 2, bd= 4,
fg= "black", font=('Times New Roman',10,'bold'),
width=12, text= "Go Change Price", bg= "powder
blue",command = bck)
btn_bck.grid(row=7, column= 2,sticky=S)
btn_exit = Button(left, padx= 8, pady= 2, bd= 4,
fg= "black", font=('Times New Roman',10,'bold'),
width=12, text= "Exit", bg= "powder
blue",command = qexit)
btn_exit.grid(row=8, column= 3,sticky=S)
root.mainloop() |
| |
|
| 3- |
price.py
from
tkinter
import*
import
tkinter.messagebox
left1 =
Tk()
#### creating window, Center of Screen, its
geometry ######
window_width = 440
window_height = 380
# get the screen size of your computer [width
and height using the left1 object as foolows]
screen_width
= left1.winfo_screenwidth()
screen_height
= left1.winfo_screenheight()
# Get the window position from the top
dynamically as well as position from left or
right as follows
position_top =
int(screen_height/2
- window_height/2)
position_right =
int(screen_width
/ 2 - window_width/2)
# this is the line that will center your
window
left1.geometry( f'{window_width}x{window_height}+{position_right}+{position_top}')
#--------------
left1.title( "Change
Price")
##Menu
def
enter1():
left1.destroy()
import
restaurant_management_system
def
enter2():
left1.destroy()
import
price
# Creating Menubar
menubar =
Menu(left1)
# Adding Operation Menu and commands
Operation =
Menu(menubar,
tearoff = 0)
menubar.add_cascade(label = 'Operation',
menu = Operation)
Operation.add_command(label = 'Restaurant
Bill',
command = enter1)
Operation.add_separator()
Operation.add_command(label = 'Change
Price',
command =
None)
#Operation.add_separator()
# Adding Edit Menu and commands
Exit =
Menu(menubar,
tearoff = 0)
menubar.add_command(label = 'Exit',
command = left1.destroy)
# display Menu
left1.config(menu = menubar)
label4 =
Label(left1,
font = ('Times
New Roman',30,'bold'),
text ="Change
Price", fg
=
"steel blue",
bd = 10, anchor =
'w')
label4.grid(row = 0, column= 1)
fries_inp_p =
StringVar()
Sandwich_inp_p =
StringVar()
burger_inp_p =
StringVar()
drinks_inp_p =
StringVar()
Pasta_inp_p =
StringVar()
Tacos_inp_p =
StringVar()
def
update():
f = open( 'value.txt','r')
line = f.readlines()
fries_p =
float(line[0])
Sandwich_p =
float(line[1])
burger_p =
float(line[2])
drinks_p =
float(line[3])
Pasta_p =
float(line[4])
Tacos_p =
float(line[5])
f.close()
f2 = open( 'value.txt','w')
try:
CoF1 =
float(fries_inp_p.get())
except
Exception
as e:
if
fries_inp_p.get() !=
"":
tkinter.messagebox.showinfo('Error','Incorrect
Input')
fries_inp_p.set( "")
f2.write( str(fries_p)+"\n")
else:
f2.write( str(CoF1)+"\n")
try:
CoS1 =
float(Sandwich_inp_p.get())
except
Exception
as e:
if
Sandwich_inp_p.get() !=
"":
tkinter.messagebox.showinfo('Error','Incorrect
Input')
Sandwich_inp_p.set( "")
f2.write( str(Sandwich_p)+"\n")
else:
f2.write( str(CoS1)+"\n")
try:
CoB1 =
float(burger_inp_p.get())
except
Exception
as e:
if
burger_inp_p.get() !=
"":
tkinter.messagebox.showinfo('Error','Incorrect
Input')
burger_inp_p.set( "")
f2.write( str(burger_p)+"\n")
else:
f2.write( str(CoB1)+"\n")
try:
CoD1 =
float(drinks_inp_p.get())
except
Exception
as e:
if
drinks_inp_p.get() !=
"":
tkinter.messagebox.showinfo('Error','Incorrect
Input')
drinks_inp_p.set( "")
f2.write( str(drinks_p)+"\n")
else:
f2.write( str(CoD1)+"\n")
try:
CoP1 =
float(Pasta_inp_p.get())
except
Exception
as e:
if
Pasta_inp_p.get() !=
"":
tkinter.messagebox.showinfo('Error','Incorrect
Input')
Pasta_inp_p.set( "")
f2.write( str(Pasta_p)+"\n")
else:
f2.write( str(CoP1)+"\n")
try:
CoC1 =
float(Tacos_inp_p.get())
except
Exception
as e:
if
Tacos_inp_p.get() !=
"":
tkinter.messagebox.showinfo('Error','Incorrect
Input')
Tacos_inp_p.set( "")
f2.write( str(Tacos_p))
else:
f2.write( str(CoC1))
#f.write(str(Sandwich_p)
+"\n"+ str(Pasta_p) +"\n"+ str(Tacos_p) +"\n"+
str(fries_p) +"\n"+ str(burger_p) +"\n"+
str(drinks_p))
tkinter.messagebox.showinfo('Update
Box','Successfully
Updated')
f2.close()
def
reset1():
fries_inp_p.set( "")
Sandwich_inp_p.set( "")
burger_inp_p.set( "")
drinks_inp_p.set( "")
Pasta_inp_p.set( "")
Tacos_inp_p.set( "")
def
qexit1():
left1.destroy()
def
printfn():
f3 = open( 'value.txt','r')
liness = f3.readlines()
fries_p =
float(liness[0])
Sandwich_p =
float(liness[1])
burger_p =
float(liness[2])
drinks_p =
float(liness[3])
Pasta_p =
float(liness[4])
Tacos_p =
float(liness[5])
#View
fries_inp_p.set(liness[0])
Sandwich_inp_p.set(liness[1])
burger_inp_p.set(liness[2])
drinks_inp_p.set(liness[3])
Pasta_inp_p.set(liness[4])
Tacos_inp_p.set(liness[5])
#print
print( "fry
"+str(fries_p))
print( "Sandwich
"+str(Sandwich_p))
print( "burger
"+str(burger_p))
print( "drinks
"+str(drinks_p))
print( "Pasta
"+str(Pasta_p))
print( "Tacos
"+str(Tacos_p))
f3.close()
def
backfn():
left1.destroy()
import
restaurant_management_system
fries =
Label(left1,
font=('Times
New Roman',12,'bold'),text
=
"Fries",
bd= 10, anchor =
'w' )
fries.grid(row=1,column=0,sticky = E)
txt_fries =
Entry(left1,font=('Times
New Roman',12,'bold'),
textvariable=fries_inp_p, bd=7, insertwidth
=4,bg =
"powder blue",
justify ='right')
txt_fries.grid(row=1,column=1)
Sandwich =
Label(left1,
font=('Times
New Roman',12,'bold'),text
=
"Sandwich",
bd= 10, anchor =
'w' )
Sandwich.grid(row=2,column=0,sticky = E)
txt_Sandwich =
Entry(left1,font=('Times
New Roman',12,'bold'),
textvariable=Sandwich_inp_p, bd=7, insertwidth
=4,bg =
"powder blue",
justify ='right')
txt_Sandwich.grid(row=2,column=1)
burger =
Label(left1,
font=('Times
New Roman',12,'bold'),text
=
"Burger",
bd= 10, anchor =
'w' )
burger.grid(row=3,column=0,sticky = E)
txt_burger =
Entry(left1,font=('Times
New Roman',12,'bold'),
textvariable=burger_inp_p, bd=7, insertwidth
=4,bg =
"powder blue",
justify ='right')
txt_burger.grid(row=3,column=1)
drinks =
Label(left1,
font=('Times
New Roman',12,'bold'),text
=
"Drinks",
bd= 10, anchor =
'w' )
drinks.grid(row=4,column=0,sticky = E)
txt_drinks =
Entry(left1,font=('Times
New Roman',12,'bold'),
textvariable=drinks_inp_p, bd=7, insertwidth
=4,bg =
"powder blue",
justify ='right')
txt_drinks.grid(row=4,column=1)
Pasta =
Label(left1,
font=('Times
New Roman',12,'bold'),text
=
"Pasta",
bd= 10, anchor =
'w' )
Pasta.grid(row=5,column=0,sticky = E)
txt_Pasta =
Entry(left1,font=('Times
New Roman',12,'bold'),
textvariable=Pasta_inp_p, bd=7, insertwidth
=4,bg =
"powder blue",
justify ='right')
txt_Pasta.grid(row=5,column=1)
Tacos =
Label(left1,
font=('Times
New Roman',12,'bold'),text
=
"Tacos",
bd= 10, anchor =
'w' )
Tacos.grid(row=6,column=0,sticky = E)
txt_Tacos =
Entry(left1,font=('Times
New Roman',12,'bold'),
textvariable=Tacos_inp_p, bd = 7, insertwidth
=4,bg =
"powder blue",
justify ='right')
txt_Tacos.grid(row=6,column=1)
btn_print =
Button(left1,
padx= 10, pady=4, bd= 4, fg=
"black",
font=('Times
New Roman',10,'bold'),
width=7, text=
"View/Print",
bg=
"powder blue",command
= printfn)
btn_print.grid(row=7, column= 0)
btn_reset1 =
Button(left1,
padx= 10, pady=4, bd= 4, fg=
"black",
font=('Times
New Roman',10,'bold'),
width=7, text=
"Clear Box",
bg=
"powder blue",command
= reset1)
btn_reset1.grid(row=7, column= 1)
btn_update =
Button(left1,
padx= 10, pady=4, bd= 4, fg=
"black",
font=('Times
New Roman',10,'bold'),
width=7, text=
"Update Entry",
bg=
"powder blue",command
= update)
btn_update.grid(row=7, column= 2 ,sticky = W)
#btn_back = Button(left1, padx= 10, pady=4,
bd= 4, fg= "black", font=('Times New
Roman',10,'bold'), width=7, text= "Back", bg=
"powder blue",command = backfn)
#btn_back.grid(row=5, column= 2)
btn_exit1 =
Button(left1,
padx= 10, pady=4, bd= 4, fg=
"black",
font=('Times
New Roman',10,'bold'),
width=7, text=
"Exit", bg=
"powder blue",command
= qexit1)
btn_exit1.grid(row=5, column= 2)
left1.mainloop() |
| |
|
| 4- |
value.txt
7.0
5.0
8.0
4.0
6.0
9.0 |
|
| | |
- Output:
|
| | |
| | |
|
7- |
Python - Show Frames / Images &
open/write/Display txt file in Form
|
|
|
| |
|
- Python program, of tkinter Module to
display Images and write txt file
- Create a new Python project In Visual Studio 2019
- the
Microsoft Visual Studio (... or 2019) is
a powerful IDE for Python language
-
Open/Run Microsoft Visual Studio 2019
- To
view Python templates, search for python.
|
|
Select
the
Python Application template,
and select
Next. |
- Create a new Python project In Visual Studio 2019
On the Configure your new project
screen - (specify a name and
file location for the project, and then select
Create)
Project name:
Py_FrameImage
Location: C:\Users\...\source\repos
(default location for
Visual Studio 2019)
|
- The new project opens in Visual Studio 2019
- (Visual Studio 2019 Compiler - IDE, to compile Python
project / file )
- Using
Visual studio 2019 Compiler - IDE, to compile
Python project / file
- Show
Frames / Images & open/write/Display txt file IN PYTHON
Form
- Python
Project Propeieties -
Py_FrameImage
- Download Python
Project : Py_FrameImage.zip - (24.4
KB zip file)
Download
-
Project consist of:
1- One Python Form - (Py_FrameImage.py )
2- png picture files - images
(0MzarGazir.png+ 0Mzarpictures.png + mzard.png)
3- txt file - MzarGazir.txt
- show
Images & Display txt file at Form
|
 | |
|
Download Python
Project : Py-FrameImage.zip - (1.25
MB zip file)
download
|
- Source Code:
Download this
Source Code at python file: Py_FrameImage.py - (3.7
KB Python file)
download
|
|
History Info - (st
Louis school Gazir / Palais du Mzar Gazir-Lebanon
), txt file: MzarGazir.txt - (3
KB Python file)
download |
|
Continue
|
Python Code
of tkinter Module to
display Images and write txt file | |
|
|
| |
import
tkinter
as
tk
import
tkinter.messagebox
import
os
def
callback():
"""
Asks the user if they really want to quit
"""
if
tkinter.messagebox.askokcancel("Quit",
"Do you really wish to quit?"):
root.destroy()
def
list_info():
"""
Displays user input as textBox
"""
try:
Text11.configure(foreground="black")
Text11.delete("1.0",tk.END)
f = open("Data\MzarGazir.txt",
"r")
contents = f.read()
#Text1= f.read()
Text11.insert(tk.END,contents)
#
print(Text1)
f.close()
except
FileNotFoundError:
contents =
'
'
#### categories_list_label = tk.Label(Frame3,
text = " " + '\n'+ contents[:-1], bg = "darkorange",
fg ="black", font = "arial, 10",justify=tk.LEFT,
yscrollcommand=y_scrollbar.set, xscrollcommand=x_scrollbar.set).grid(row=1,column=0)
root =
tk.Tk()
root.protocol("WM_DELETE_WINDOW",
callback)
#root.geometry("1024x600")
#---------Form, Center of Screen--
window_width = 865
window_height = 600
# get the screen size of your computer [width
and height using the root object as foolows]
screen_width
= root.winfo_screenwidth()
screen_height
= root.winfo_screenheight()
# Get the window position from the top
dynamically as well as position from left or
right as follows
position_top =
int(screen_height/2
-window_height/2)
position_right =
int(screen_width
/ 2 - window_width/2)
# this is the line that will center your
window
root.geometry(f'{window_width}x{window_height}+{position_right}+{position_top}')
root.resizable(0, 0)
root.title("Palais
du Mzar / Saint Louis School (1880-1915), Ghazir,
Lebanon")
#----
img22_frame =
tk.LabelFrame(root,
text='')
img22_frame.grid(row=1, column=2, sticky='w')
# show picture
img22=tk.PhotoImage(file
=
"0Mzarpictures.png")
w22=tk.Label(img22_frame,image
= img22).pack(anchor =
'center')
b2 =
tk.Button(root,
image=img22, command=list_info).grid(row=1,
column=2, sticky='n')
img2_frame =
tk.LabelFrame(root,
text='')
img2_frame.grid(row=1, column=1, sticky='n')
# show picture
img21=tk.PhotoImage(file
=
"0MzarGazir.png")
w21=tk.Label(img2_frame,image
= img21).pack(anchor =
'center')
b1 =
tk.Button(root,
image=img21, command=list_info).grid(row=1,
column=1, sticky='n')
img3_frame =
tk.LabelFrame(root,
text='')
img3_frame.grid(row=1, column=3, sticky='n')
# show picture
img31=tk.PhotoImage(file
=
"mzard.png")
w31=tk.Label(img3_frame,image
= img31).pack(anchor =
'center')
# button with image binded to the same
function
b3 =
tk.Button(root,
image=img31, command=list_info).grid(row=1,
column=3, sticky='n')
Frame3 =
tk.Frame(root)
Frame3.place(relx=0.001, rely=0.68, relheight=0.33,
relwidth=0.99)
Frame3.configure(relief="groove",
borderwidth="0",
background="#ffffff",
highlightbackground="#ffffff",
highlightcolor="black",
width=870)
Text11 =
tk.Text(Frame3)
Text11.place(relx=0.002, rely=0.002,
height=180, width=860)
scroll_y =
tk.Scrollbar(Frame3,
orient="vertical",
command=Text11.yview)
scroll_y.pack(side="left",
expand=True,
fill="y",
anchor ='ne'
)
Text11.configure(yscrollcommand=scroll_y.set,
padx=960)
Text11.configure(background="white",
borderwidth="2",
font = ('Times
New Roman',12,'bold'),
foreground="Maroon",
highlightbackground="#ffffff",
highlightcolor="black",
insertbackground="black",
selectbackground="#e6e6e6",
selectforeground="black",
padx=15, pady=4 )#,
height=60, width=94, wrap=WORD
Text11.insert(tk.END,"...
Click Button Info or any Images - more History
Data Display, about this Palais / School in
Ghazir, Lebanon ...")
bouton_list =
tk.Button(root,
background="silver",
font = ('Times
New Roman',10,'bold'),
text="Info",
command=list_info).grid(row=1, column =3,
sticky='sw',
padx=2, pady=3, ipadx=15, ipady= 5)
bouton_quitter =
tk.Button(root,
background="silver",
font = ('Times
New Roman',10,'bold'),
text="Exit",
command=callback).grid(row=1, column =3, sticky='se',
padx=2, pady=3, ipadx=15, ipady= 5)
root.mainloop()
|
| |
this Historic Info stored at txt file: MzarGazir.txt - (3
KB Python file)
download
|
| |
Historic Info |
| |
Palais
du Mzar / Saint Louis School (1880-1915), Ghazir,
Lebanon
1- the
first edification was built in the middle of the
XVIIIth century by Emir Bechir Chehab II,
foremost Lebanese Emir, as a birth gift for his
nephew Abdallah Chehab.
2- In 1880, the Palace was turned into the first
and leading Lebanese private school by
Monseigneur Louis Zouein, until the
first world war broke through. Today it is
closed and abandoned
3- During the world war, Armenian refugees were
hosted and a carpet factory was set in order to
provide work to them. A
rug was offered to the American President John
Coolidge in 1925 and is still at the White House
4- In 1935, the Msar cellars originated the
production of Chateau Musar vintage, which
became, under the direction of
Gaston and Serge Hochar, one of the world’s
finest and most renowned wines.
5- The Palace is a classified Lebanese
historical monuments since 1975, specifically
for its patio, its oval shape fountain and its
seaside facade.
6- The Lebanese Maronite Family, Zouein, is
owner of This Palace
7- Unfortunately, the incomes of this property
have been usurped and pillaged for long years by
the Descedants of Georges Beik Zouein family,
with coverage of the Maronite Patriarchate in
Bkerke - (the Maronite Patriarchate is legally
monitor of this property) |
| |
|
|
| | |
- Output:
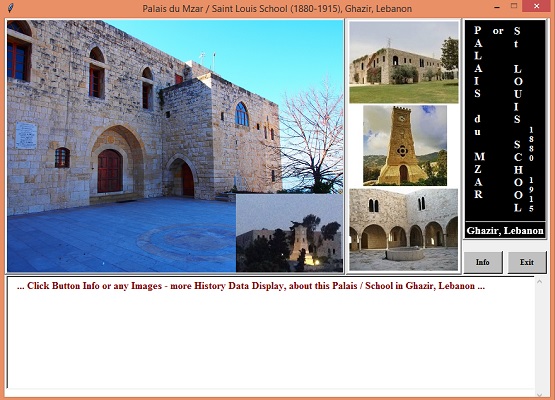 |
| pic 1 after loading |
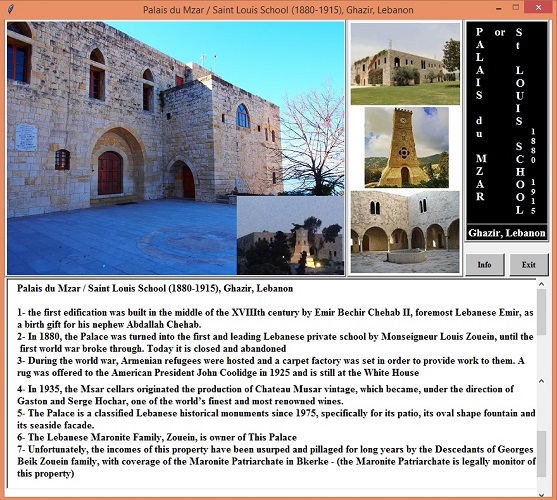 |
| Pic 2, after click info button,
contents of txt file Display |
| |
| | | |
| |
|
|
8- |
Python GUI
Functions, Tkinter - Horizontal Radio Button Design |
|
|
| |
|
- Python GUI Functions, Tkinter - Horizontal Radio Button Design
- Create a new Python project In Visual Studio 2022
- the
Microsoft Visual Studio (... or 2019 or 2022) is
a powerful IDE for Python language
-
Open/Run Microsoft Visual Studio 2022
- To
view Python templates, search for python.
|
|
Select
the
Python Application template,
and select
Next. |
- Create a new Python project In Visual Studio 2022
On the Configure your new project
screen - (specify a name and
file location for the project, and then select
Create)
Project name: Py_GUI_Check
Location: C:\Users\...\source\repos
(default location for
Visual Studio 2022)
|
- The new project opens in Visual Studio 2022
- (Visual Studio 2022 Compiler - IDE, to compile Python
project / file )
- The
Visual Studio Solution Explorer window shows the
project structure
- Python
Project Properieties -
Py_GUI_Check
- Projct
Folder:
C:\Users\...\source\repos\Py_GUI_Check
- Startup
File: Py_GUI_Check.py
- Project
file: Py_GUI_Check.sln
|
- Download Python
Project : Py_GUI_Check.zip - (11.1
KB zip file) Download
-
Project consist of:
One Python Form - (Py_GUI_Check.py )
|
 | |
|
Download Python
Project : Py_GUI_Check.zip - (11.1
KB zip file) Download |
- Source Code:
|
Download this Source Code at
python file: Py_GUI_Check.py
- (3.68 KB Python
file)
download
|
|
Continue
|
Python Code,
to display GUI
Functions | |
|
|
| |
|
grid()
method in Tkinter
The
Grid geometry manager
puts the widgets in a 2-dimensional table.
The master widget is split into a number
of rows and columns, and each “cell” in
the resulting table can hold a widget.
The grid manager is the
most flexible of the geometry managers in
Tkinter. If you don’t want to learn
how and when to use all three managers,
you should at least make sure to learn
this one.
Consider the following example –
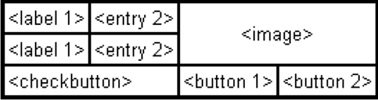
Creating this layout using the
pack manager is possible, but it
takes a number of extra frame widgets, and
a lot of work to make things look good. If
you use the grid manager instead, you only
need one call per widget to get everything
laid out properly.
Using the grid manager is
easy. Just create the widgets, and use the
grid method to tell the
manager in which row and column to place
them. You don’t have to specify the size
of the grid beforehand; the manager
automatically determines that from the
widgets in it.
|
|
| |
import tkinter as tk
from tkinter import ttk
from tkinter import scrolledtext
# Create instance
win = tk.Tk()
# Add a title
win.title("Python GUI")
#New
win.geometry('310x180')
# Modified Button Click Function
def click_me():
action.configure(text='Hello ' + name.get() + ' ' + number_chosen.get())
# Changing our Label
ttk.Label(win, text=" Enter a name:").grid(row=0, column=0, sticky = tk.W, pady = 2)
#"Enter a name: "
#"Choose a number: "
# Adding a Textbox Entry widget
name = tk.StringVar()
name_entered = ttk.Entry(win, width=16, textvariable=name)
name_entered.grid(column=1, row=0, sticky = tk.W)
# Adding a Button
action = ttk.Button(win, text="Click Me!", command=click_me)
action.grid(row=1, column=2, sticky = tk.W, pady = 2)
# Creating three checkbuttons
ttk.Label(win, text=" Choose a number: ").grid(row=1, column=0, sticky = tk.W, pady = 2)
number = tk.StringVar()
number_chosen = ttk.Combobox(win, width=13, textvariable=number, state='readonly')
number_chosen['values'] = (1, 2, 4, 42, 100)
number_chosen.grid(row=1, column=1, sticky = tk.W, pady = 2)
number_chosen.current(0)
# checkBuutton = no fuction
chVarDis = tk.IntVar()
check1 = tk.Checkbutton(win, text="Disabled", variable=chVarDis, state='disabled')
check1.select()
check1.grid(column=0, row=3, sticky=tk.W)
chVarUn = tk.IntVar()
check2 = tk.Checkbutton(win, text="UnChecked", variable=chVarUn)
check2.deselect()
check2.grid(column=1, row=3, sticky=tk.W)
chVarEn = tk.IntVar()
check3 = tk.Checkbutton(win, text="Enabled", variable=chVarEn)
check3.select()
check3.grid(column=2, row=3, sticky=tk.W)
# GUI callback function
#chVarDis == check1
#chVarUn == check2
#chVarEn == check3
def checkCallback(*ignoredArgs):
# only enable one checkbutton
if chVarEn.get(): check1.configure(state='disabled', text="Disabled")
else: check1.configure(state='normal', text="Checked")
if chVarUn.get(): check2.configure(state='normal', text="Checked")
else: check2.configure(state='normal', text="Enabled")
if chVarDis.get(): check3.configure(state='normal', text="Checked")
else: check3.configure(state='normal', text="Enabled")
if chVarEn.get(): check3.configure(state='normal', text="Checked")
else: check3.configure(state='normal', text="UnChecked")
# trace the state of the two checkbuttons
chVarDis.trace('w', lambda unused0, unused1, unused2 : checkCallback())
chVarUn.trace('w', lambda unused0, unused1, unused2 : checkCallback())
chVarEn.trace('w', lambda unused0, unused1, unused2 : checkCallback())
# Changing our Label
ttk.Label(win, text=" Activate Scroll:").grid(row=5, column=0, sticky = tk.W, pady = 2)
# scrolled text
scr = scrolledtext.ScrolledText(win, width=25, height=3, wrap=tk.WORD)
scr.grid(row=6, column=0, sticky= 'WE', columnspan=3)
# radio button global variables
colors = ["Blue", "Gold", "gray"]
# Radiobutton callback function
def radCall():
radSel=radVar.get()
if radSel == 0: win.configure(background=colors[0])
elif radSel == 1: win.configure(background=colors[1])
elif radSel == 2: win.configure(background=colors[2])
radVar = tk.IntVar()
# Next we are selecting a non-existing index value for radVar.
radVar.set(99)
# Now we are creating all three Radiobutton widgets within one loop.
for col in range(3):
curRad = 'rad' + str(col)
curRad = tk.Radiobutton(win, text=colors[col], variable=radVar, value=col, command=radCall)
curRad.grid(column=col, row=9, sticky=tk.W)
# direct keyboard input to text box entry
name_entered.focus()
win.mainloop() | |
|
| | |
- Output:
|
1- Default View, of Python
GUI Functions - Horizontal Radio Button Design |
|
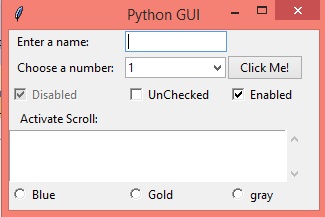 |
|
|
|
|
|
2- View1, Enter an name, Choose a number, Checked |
3- View2, Enter an name, Choose a number, Checked , Radio - Blue |
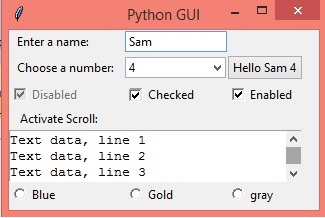 |
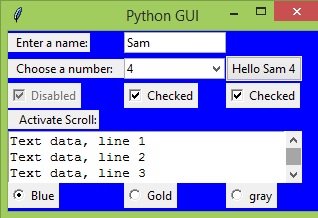 |
|
|
|
|
4- View3, Enter an name, Choose a number, Checked , Radio - Gold |
|
 |
|
|
| | |
|
| |
|
| 9- |
Python GUI
Functions, Tkinter - Vertical Radio Button Design |
|
|
| |
|
- Python GUI Functions, Tkinter - Vertical Radio Button Design
- Create a new Python project In Visual Studio 2022
- the
Microsoft Visual Studio (... or 2019 or 2022) is
a powerful IDE for Python language
-
Open/Run Microsoft Visual Studio 2022
- To
view Python templates, search for python.
|
|
Select
the
Python Application template,
and select
Next. |
- Create a new Python project In Visual Studio 2022
On the Configure your new project
screen - (specify a name and
file location for the project, and then select
Create)
Project name:
Py_GUI_radio
Location: C:\Users\...\source\repos
(default location for
Visual Studio 2022)
|
- The new project opens in Visual Studio 2022
- (Visual Studio 2022 Compiler - IDE, to compile Python
project / file )
- The
Visual Studio Solution Explorer window shows the
project structure
- Python
Project Properieties -
Py_GUI_radio
- Projct
Folder:
C:\Users\...\source\repos\Py_GUI_radio
- Startup
File: Py_GUI_radio.py
- Project
file: Py_GUI_radio.sln
|
- Download Python
Project : Py_GUI_radio.zip - (10.5
KB zip file) Download
-
Project consist of:
One Python Form - (Py_GUI_radio.py )
|
 | |
|
Download Python
Project : Py_GUI_radio.zip - (10.5
KB zip file) Download |
- Source Code
|
Download this Source Code at
python file: Py_GUI_radio.py -
(3.78 KB Python file)
download |
|
Continue |
Python GUI
Functions, Tkinter - Vertical Radio Button
Design | |
|
|
| |
|
import
tkinter
as
tk
from
tkinter
import
ttk
from
tkinter
import
scrolledtext
# Create instance
win =
tk.Tk()
# Add a title
win.title( "Python
GUI")
#New
win.geometry( '300x185')
# Modified Button Click Function
def
click_me():
action.configure(text= 'Hello
' +
name.get() +
'
' +
number_chosen.get())
def
destroy():
win.destroy()
# Changing our Label
ttk .Label(win,
text="
Enter a name:").grid(row=0,
column=0, sticky =
tk.W, pady
= 2)
#"Enter a name: "
#"Choose a number: "
# Adding a Textbox Entry widget
name =
tk.StringVar()
name_entered =
ttk.Entry(win,
width=16, textvariable=name)
name_entered. grid(column=1,
row=0, sticky =
tk.W)
# Adding a Button
action =
ttk.Button(win,
text="Click
Me!",
command=click_me)
action. grid(row=1,
column=2, sticky =
tk.W, pady
= 2)
# Creating three checkbuttons
ttk .Label(win,
text="
Choose a number: ").grid(row=1,
column=0, sticky =
tk.W, pady
= 2)
number =
tk.StringVar()
number_chosen =
ttk.Combobox(win,
width=13, textvariable=number, state='readonly')
number_chosen[ 'values']
= (1, 2, 4, 42, 100)
number_chosen. grid(row=1,
column=1, sticky =
tk.W, pady
= 2)
number_chosen.current(0)
# checkBuutton = no fuction
chVarDis =
tk.IntVar()
check1 =
tk.Checkbutton(win,
text="Disabled",
variable=chVarDis, state='disabled')
check1.select()
check1.grid(column=0, row=3, sticky= tk.W)
chVarUn =
tk.IntVar()
check2 =
tk.Checkbutton(win,
text="UnChecked",
variable=chVarUn)
check2.deselect()
check2.grid(column=1, row=3, sticky= tk.W)
chVarEn =
tk.IntVar()
check3 =
tk.Checkbutton(win,
text="Enabled",
variable=chVarEn)
check3.select()
check3.grid(column=2, row=3, sticky= tk.W)
# GUI callback function
#chVarDis == check1
#chVarUn == check2
#chVarEn == check3
def
checkCallback(*ignoredArgs):
#
only enable one checkbutton
if
chVarEn.get(): check1.configure(state='disabled',
text="Disabled")
else:
check1.configure(state='normal',
text="Checked")
if
chVarUn.get(): check2.configure(state='normal',
text="Checked")
else:
check2.configure(state='normal',
text="Enabled")
if
chVarDis.get(): check3.configure(state='normal',
text="Checked")
else:
check3.configure(state='normal',
text="Enabled")
if
chVarEn.get(): check3.configure(state='normal',
text="Checked")
else:
check3.configure(state='normal',
text="UnChecked")
# trace the state of the two checkbuttons
chVarDis.trace( 'w',
lambda
unused0,
unused1,
unused2 :
checkCallback())
chVarUn.trace( 'w',
lambda
unused0,
unused1,
unused2 :
checkCallback())
chVarEn.trace( 'w',
lambda
unused0,
unused1,
unused2 :
checkCallback())
# Changing our Label
ttk .Label(win,
text="Activate
Scroll:").grid(row=5,
column=1, sticky =
tk.W, pady
= 2)
# scrolled text
scr =
scrolledtext.ScrolledText(win,
width=5, height=3, wrap=tk.WORD)
scr. grid(row=6,
column=1, sticky=
'WE',
columnspan=3)
# radio button global variables
colors = [ "Blue",
"Gold",
"gray"]
# Radiobutton callback function
def
radCall():
radSel=radVar.get()
if radSel
== 0: win.configure(background=colors[0])
elif
radSel == 1: win.configure(background=colors[1])
elif
radSel == 2: win.configure(background=colors[2])
radVar =
tk.IntVar()
# Next we are selecting a non-existing index
value for radVar.
radVar.set(99)
# Now we are creating all three Radiobutton
widgets within one loop.
for col
in
range(3):
curRad =
'rad'
+
str(col)
curRad =
tk.Radiobutton(win,
text=colors[col], variable=radVar, value=col,
command=radCall)
curRad.grid(column=0, row=col+5, sticky= tk.W)
# Adding a Button
action1 =
ttk.Button(win,
text="Exit",
command=destroy)
action1. grid(row=7,
column=2, sticky =
tk.W, pady
= 2)
# direct keyboard input to text box entry
name_entered. focus()
win.mainloop() |
|
|
| | |
- Output:
|
1- Default View, of Python
GUI Functions - Vertical Radio Button Design |
|
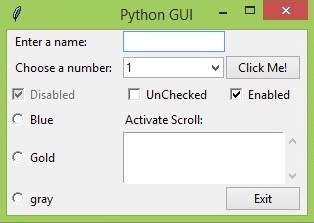 |
|
|
|
|
|
2- View1, Enter an name, Choose a number, Checked |
3- View2, Enter an name, Choose a number, Checked, Radio - Gold |
 |
 |
| |
|
3- View3, Enter an name, Choose a number, Checked, Radio -gray |
|
 |
|
|
| | |
|
| |
|
|
10- |
Python Program
to display Menu + TabControl + image + Progress + ... |
|
|
| |
|
- Python Project (Program)
to display Menu + TabControl + image + Progress + ...
- Create a new Python project In Visual Studio 2019
- the
Microsoft Visual Studio (... or 2019) is
a powerful IDE for Python language
-
Open/Run Microsoft Visual Studio 2019
- To
view Python templates, search for python.
|
|
Select
the
Python Application template,
and select
Next. |
- Create a new Python project In Visual Studio 2019
On the Configure your new project
screen - (specify a name and
file location for the project, and then select
Create)
Project name:
Py_progresss
Location: C:\Users\...\source\repos
(default location for
Visual Studio 2019)
|
- The new project opens in Visual Studio 2019
- (Visual Studio 2019 Compiler - IDE, to compile Python
project / file )
- The
Visual Studio Solution Explorer window shows the
project structure
- Python
Project Properieties -
Py_progresss
- Projct
Folder:
C:\Users\...\source\repos\Py_progresss
- Startup
File: Py_progresss.py
- Project
file: Py_progresss.sln
|
- Download Python
Project : Py_progresss.zip - (24.9
KB zip file)
Download
-
Project consist of:
One Python Form - (Py_progresss.py )
and two gif file - images (istotab1a.gif + istotab2.gif)
|
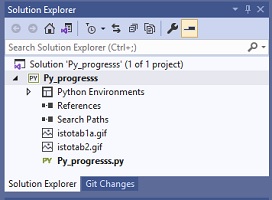 | |
|
Download Python
Project : Py_progresss.zip - (24.9
KB zip file)
Download |
- Source Code
|
Download this Source Code at
python file: Py_progresss.py - (8.18 KB
Python file) download
|
|
Continue
|
Python Code,
to display Menu + TabControl + image + Progress + ... | |
|
|
| |
|
#====================== # imports
#======================
import
tkinter
as
tk
from
tkinter
import
ttk
from
tkinter
import
scrolledtext
from
tkinter
import
Menu
from
tkinter
import
messagebox
as
msg
from
tkinter
import
Spinbox
from
time
import
sleep
# Create instance
win =
tk.Tk()
# Add a title
win.title( "Python
GUI")
#---------Form, Center of Screen--
window_width = 300
window_height = 275
# get the screen size of your computer [width
and height using the root object as foolows]
screen_width
= win.winfo_screenwidth()
screen_height
= win.winfo_screenheight()
# Get the window position from the top
dynamically as well as position from left or
right as follows
position_top =
int(screen_height/2
-window_height/2)
position_right =
int(screen_width
/ 2 - window_width/2)
# this is the line that will center your
window
win.geometry( f'{window_width}x{window_height}+{position_right}+{position_top}')
tabControl =
ttk.Notebook(win)
#
Create Tab Control
tab1 =
ttk.Frame(tabControl)
#
Create a tab
tabControl.add(tab1, text= 'Tab
1')
#
Add the tab
tab2 =
ttk.Frame(tabControl)
#
Add a second tab
tabControl.add(tab2, text= 'Tab
2')
#
Make second tab visible
tabControl. pack(expand=1,
fill="both")
#
Pack to make visible
# LabelFrame using tab1 as the parent
mighty =
ttk.LabelFrame(tab1,
text='
Mighty Python ')
mighty. grid(column=0,
row=0, padx=8, pady=4)
# Modify adding a Label using mighty as the
parent instead of win
a_label =
ttk.Label(mighty,
text="Enter
a name:")
a_label. grid(column=0,
row=0, sticky='W')
# Modified Button Click Function
def
click_me():
action.configure(text= 'Hello
' +
name.get() +
'
' +
number_chosen.get())
# Adding a Textbox Entry widget
name =
tk.StringVar()
name_entered =
ttk.Entry(mighty,
width=12, textvariable=name)
name_entered. grid(column=0,
row=1, sticky='W')
#
align left/West
# Adding a Button
action =
ttk.Button(mighty,
text="Click
Me!",
command=click_me)
action. grid(column=2,
row=1)
ttk .Label(mighty,
text="Choose
a number:").grid(column=1,
row=0)
number =
tk.StringVar()
number_chosen =
ttk.Combobox(mighty,
width=12, textvariable=number, state='readonly')
number_chosen[ 'values']
= (1, 2, 4, 42, 100)
number_chosen. grid(column=1,
row=1)
number_chosen.current(0)
# Spinbox callback
def
_spin():
value =
spin.get()
print( value)
scrol.insert( tk.INSERT,
value +
'\n')
# Adding a Spinbox widget
spin =
Spinbox(mighty,
values=(1, 2, 4, 42, 100), width=5, bd=9,
command=_spin)
#
using range
spin.grid(column=0, row=2)
# Using a scrolled Text control
scrol_w = 30
scrol_h = 3
scrol =
scrolledtext.ScrolledText(mighty,
width=scrol_w, height=scrol_h, wrap=tk.WORD)
scrol. grid(column=0,
row=3, sticky='WE',
columnspan=3)
# Create a container for image
img1_frame =
ttk.LabelFrame(tab1,
text='image')
img1_frame. grid(column=0,
row=1, sticky='n',
columnspan=2)
# show image
img11= tk.PhotoImage(file
=
"istotab1a.gif")
w11= tk.Label(img1_frame,image
= img11).pack(anchor =
'center')
# Tab Control 2 refactoring
---------------------------------------------------------
# We are creating a container frame to hold
all other widgets -- Tab2
mighty2 =
ttk.LabelFrame(tab2,
text='
The Snake ')
mighty2. grid(column=0,
row=0, padx=8, pady=4)
# Creating three checkbuttons
chVarDis =
tk.IntVar()
check1 =
tk.Checkbutton(mighty2,
text="Disabled",
variable=chVarDis, state='disabled')
check1.select()
check1.grid(column=0, row=0, sticky= tk.W)
chVarUn =
tk.IntVar()
check2 =
tk.Checkbutton(mighty2,
text="UnChecked",
variable=chVarUn)
check2.deselect()
check2.grid(column=1, row=0, sticky= tk.W)
chVarEn =
tk.IntVar()
check3 =
tk.Checkbutton(mighty2,
text="Enabled",
variable=chVarEn)
check3.deselect()
check3.grid(column=2, row=0, sticky= tk.W)
# GUI Callback function
def
checkCallback(*ignoredArgs):
#
only enable one checkbutton
if
chVarUn.get(): check3.configure(state='disabled')
else:
check3.configure(state='normal')
if
chVarEn.get(): check2.configure(state='disabled')
else:
check2.configure(state='normal')
# trace the state of the two checkbuttons
chVarUn.trace( 'w',
lambda
unused0,
unused1,
unused2 :
checkCallback())
chVarEn.trace( 'w',
lambda
unused0,
unused1,
unused2 :
checkCallback())
# First, we change our Radiobutton global
variables into a list
colors = [ "Blue",
"Gold",
"Red"]
# We have callback function
to be zero-based, using the list
# instead of module-level global variables
# Radiobutton Callback
def
radCall():
radSel=radVar.get()
if radSel
== 0: mighty2.configure(text='Blue')
elif
radSel == 1: mighty2.configure(text='Gold')
elif
radSel == 2: mighty2.configure(text='Red')
# create three Radiobuttons using one
variable
radVar =
tk.IntVar()
# Next we are selecting a non-existing index
value for radVar
radVar.set(99)
# Now we are creating all three Radiobutton
widgets within one loop
for col
in
range(3):
curRad =
tk.Radiobutton(mighty2,
text=colors[col], variable=radVar,
value=col, command=radCall)
curRad.grid(column=col, row=1, sticky= tk.W)
#
row=6
# Add a Progressbar to Tab 2
progress_bar =
ttk.Progressbar(tab2,
orient='horizontal',
length=286, mode='determinate')
progress_bar. grid(column=0,
row=3, pady=2)
# update progressbar in callback loop
def
run_progressbar():
progress_bar[ "maximum"]
= 100
for i
in
range(101):
sleep(0.05)
progress_bar[ "value"]
= i
#
increment progressbar
progress_bar.update()
#
have to call update() in loop
progress_bar[ "value"]
= 0
#
reset/clear progressbar
def
start_progressbar():
progress_bar.start()
def
stop_progressbar():
progress_bar.stop()
def
progressbar_stop_after(wait_ms=1000):
win.after( wait_ms,
progress_bar.stop)
# Create a container to hold buttons
buttons_frame =
ttk.LabelFrame(mighty2,
text='
ProgressBar ')
buttons_frame. grid(column=0,
row=2, sticky='W',
columnspan=2)
# Add Buttons for Progressbar commands
ttk .Button(buttons_frame,
text="
Run Progressbar ",
command=run_progressbar).grid(column=0, row=0,
sticky='W')
ttk .Button(buttons_frame,
text="
Start Progressbar ",
command=start_progressbar).grid(column=0, row=1,
sticky='W')
ttk .Button(buttons_frame,
text="
Stop immediately ",
command=stop_progressbar).grid(column=0, row=2,
sticky='W')
ttk .Button(buttons_frame,
text="
Stop after second ",
command=progressbar_stop_after).grid(column=0,
row=3, sticky='W')
for
child
in
buttons_frame.winfo_children():
child.grid_configure(padx=2, pady=2)
for
child
in
mighty2.winfo_children():
child.grid_configure(padx=8, pady=2)
# Create a container for image
img2_frame =
ttk.LabelFrame(mighty2,
text='image')
img2_frame. grid(column=1,
row=2, sticky='n',
columnspan=2)
# show image
img21= tk.PhotoImage(file
=
"istotab2.gif")
w21= tk.Label(img2_frame,image
= img21).pack(anchor =
'center')
# Exit GUI cleanly
def
_quit():
win.quit()
win.destroy()
exit()
# Creating a Menu Bar
menu_bar =
Menu(win)
win.config(menu=menu_bar)
# Add menu items
file_menu =
Menu(menu_bar,
tearoff=0)
file_menu.add_command(label= "New")
file_menu.add_separator()
file_menu.add_command(label= "Exit",
command=_quit)
menu_bar.add_cascade(label= "File",
menu=file_menu)
# Display a Message Box
def _msgBox():
msg.showinfo('Python
Message Info Box',
'A Python GUI created using tkinter:\nThe year
is 2021.')
# Add another Menu to the Menu Bar and an
item
help_menu =
Menu(menu_bar,
tearoff=0)
help_menu.add_command(label= "About",
command=_msgBox)
#
display messagebox when clicked
menu_bar.add_cascade(label= "Help",
menu=help_menu)
name_entered. focus()
#
Place cursor into name Entry
#======================
# Start GUI
#======================
win.mainloop() |
| |
|
|
| | |
- Output:
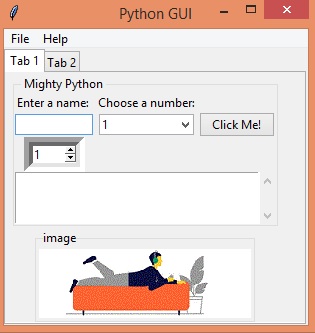 |
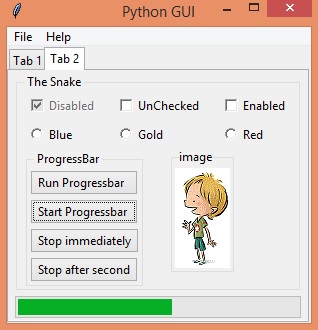 |
|
1- (Python,
to display Menu + TabControl(Tab1) + image + ...) |
2- (Python,
to display Menu + TabControl + image + Progress
+ ...) |
|
|
|
|
|
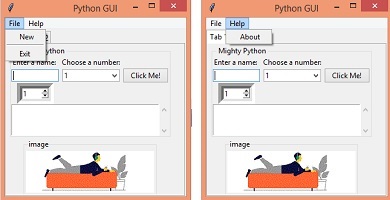
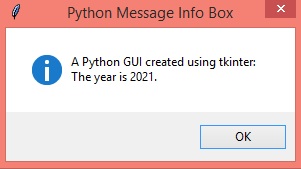 |
|
3- (1- show Menu, 2 SubMenus.
2- when to select Help Menu,
Click Submenu About: to Display Form:
Message into Box) |
|
| | |
|
| |
|
|
11- |
Python, Mini Pharmacy
Management System |
|
|
| |
|
- Mini Pharmacy Management
System to display Group of database
Functions: Navigation, Add, Update,
Delete,Search.
- Create a new Python project In Visual Studio 2022
- the
Microsoft Visual Studio (... or 2019 or 2022) is
a powerful IDE for Python language
-
Open/Run Microsoft Visual Studio 2022
- To
view Python templates, search for python.
|
|
Select
the
Python Application template,
and select
Next. |
- Create a new Python project In Visual Studio 2022
On the Configure your new project
screen - (specify a name and
file location for the project, and then select
Create)
Project name: Py-project
Location: C:\Users\...\source\repos
(default location for
Visual Studio 2022)
|
- The new project opens in Visual Studio 2022
- (Visual Studio 2022 Compiler - IDE, to compile Python
project / file )
- The
Visual Studio Solution Explorer window shows the
project structure
- Python
Project
Proprieties - Py-project
- Projct
Folder: C:\Users\...\source\repos\Py-project
- Startup
File: Py_project.py
- Project
file: Py-project.sln
|
- Download Python
Project :
Py-project.zip - (27.3
KB zip file) download
-
Project consist
of:
One Python Form - (Py_project.py )
and two data files - (database_proj3.txt + database_proj3a.txt)
|
 | |
|
Download Python
Project : Py-project.zip - 27.3
KB zip file) download
|
- Source Code
|
Download this Source Code at
python file: Py_project.py -
(7.8 KB Python file) download
|
|
Download this DataBase
file: database_proj3.txt - (0.15
KB file)
download
|
|
Download this DataBase
file: database_proj3a.txt - (0.15
KB file)
download
|
|
Continue
|
Python Code,
to display database Functions of Mini Pharmacy
Management System (Navication, Add, Update,
Delete,Search). | |
|
|
| |
from tkinter import *
from tkinter import messagebox
from tkinter import Menu
import os
f=open("database_proj3.txt",'a+')
root = Tk()
root.title("Simple Pharmacy Managment System")
#---------Form, Center of Screen--
window_width = 745
window_height = 585
# get the screen size of your computer [width
and height using the root object as foolows]
screen_width = root.winfo_screenwidth()
screen_height = root.winfo_screenheight()
# Get the window position from the top
dynamically as well as position from left or
right as follows
position_top = int(screen_height/2 -window_height/2)
position_right = int(screen_width / 2 -
window_width/2)
# this is the line that will center your window
root.geometry(f'{window_width}x{window_height}+{position_right}+{position_top}')
root.configure(bg='silver')
# Exit GUI cleanly
def _quit():
root.quit()
root.destroy()
# Creating a Menu Bar
menu_bar = Menu(root)
root.config(menu=menu_bar)
menu_bar.add_cascade(label="Exit",
command=_quit)
#-------------------
var=-1
ve1="MedName"
ve2=0
ve3=0
ve4="MedCat"
ve5=0
#--------------------
# 1- check if file database_proj3.txt exist
#1.1- file (database_proj3.txt) not exist
#1.2- create file (database_proj3.txt)
if not os.path.exists('database_proj3.txt'):
#1.2- create file (database_proj3.txt)
#1.3- add line to file
print("1a- database_proj3.txt not exists, System
create this txt file & add 1 line of Data ")
with open('database_proj3.txt', 'w') as NF:
NF.write('{0} {1} {2} {3}
{4}\n'.format(str(ve1),ve2,ve3,str(ve4),ve5))
NF.close()
print("1b- database_proj3.txt is closed")
goto .labelx
# 2-if file empty
if os.stat('database_proj3.txt').st_size == 0:
print("2a- database_proj3.txt size = 0, System
add 1 line of Data")
#2.1- add line to file
with open('database_proj3.txt', 'w') as NF:
NF.write('{0} {1} {2} {3}
{4}\n'.format(str(ve1),ve2,ve3,str(ve4),ve5))
NF.close()
print("2b- database_proj3.txt is closed")
goto .labelx
label .labelx
def printxx():
#clear listbox
lb.delete('0', 'end')
f = open("database_proj3.txt","r")
if f.mode == 'r':
for x in f:
lb.insert(END,x)
print(x)
f.close()
def additem():
global var
num_lines = 0
with open("database_proj3.txt", 'r') as f10:
for line in f10:
num_lines += 1
var=num_lines-1
e1= entry1.get()
e2=entry2.get()
e3=entry3.get()
e4=entry4.get()
e5=entry5.get()
f.write('{0} {1} {2} {3}
{4}\n'.format(str(e1),e2,e3,str(e4),e5))
entry1.delete(0, END)
entry2.delete(0, END)
entry3.delete(0, END)
entry4.delete(0, END)
entry5.delete(0, END)
f10.close
def deleteitem():
e1=entry1.get()
#with open(r"database_proj3.txt") as f,
open(r"database_proj3a.txt", "w") as working:
with open("database_proj3.txt") as f,
open("database_proj3a.txt", "w") as working:
for line in f:
if str(e1) not in line:
working.write(line)
f.close()
working.close()
# Delete file - os.remove(file_name)
os.remove("database_proj3.txt")
# Rename a file - os.rename(current_file_name,
new_file_name)
os.rename("database_proj3a.txt",
"database_proj3.txt")
f.close()
working.close()
entry1.delete(0, END)
entry2.delete(0, END)
entry3.delete(0, END)
entry4.delete(0, END)
entry5.delete(0, END)
def firstitem():
global var
var=0
f=open("database_proj3.txt", "r")
if f.mode == 'r':
f.seek(var)
c=f.readline()
v=list(c.split(" "))
entry1.delete(0, END)
entry2.delete(0, END)
entry3.delete(0, END)
entry4.delete(0, END)
entry5.delete(0, END)
entry1.insert(0,str(v[0]))
entry2.insert(0,str(v[1]))
entry3.insert(0,str(v[2]))
entry4.insert(0,str(v[3]))
entry5.insert(0,str(v[4]))
def nextitem():
global var
var += 1
f.seek(var)
try:
c = f.readlines()
xyz = c[var]
v = list(xyz.split(" "))
entry1.delete(0, END)
entry2.delete(0, END)
entry3.delete(0, END)
entry4.delete(0, END)
entry5.delete(0, END)
entry1.insert(0, str(v[0]))
entry2.insert(0, str(v[1]))
entry3.insert(0, str(v[2]))
entry4.insert(0, str(v[3]))
entry5.insert(0, str(v[4]))
except:
messagebox.showinfo("Title", "SORRY!...NO MORE
RECORDS")
def previousitem():
global var
var -= 1
f.seek(var)
try:
z = f.readlines()
xyz = z[var]
v = list(xyz.split(" "))
entry1.delete(0, END)
entry2.delete(0, END)
entry3.delete(0, END)
entry4.delete(0, END)
entry5.delete(0, END)
entry1.insert(0, str(v[0]))
entry2.insert(0, str(v[1]))
entry3.insert(0, str(v[2]))
entry4.insert(0, str(v[3]))
entry5.insert(0, str(v[4]))
except:
messagebox.showinfo("Title", "SORRY!...NO MORE
RECORDS")
def lastitem():
global var
f4=open("database_proj3.txt",'r')
x=f4.read().splitlines()
last_line= x[-1]
num_lines = 0
with open("database_proj3.txt", 'r') as f8:
for line in f8:
num_lines += 1
var=num_lines-1
print(last_line)
try:
v = list(last_line.split(" "))
entry1.delete(0, END)
entry2.delete(0, END)
entry3.delete(0, END)
entry4.delete(0, END)
entry5.delete(0, END)
entry1.insert(0, str(v[0]))
entry2.insert(0, str(v[1]))
entry3.insert(0, str(v[2]))
entry4.insert(0, str(v[3]))
entry5.insert(0, str(v[4]))
except:
messagebox.showinfo("Title", "SORRY!...NO MORE
RECORDS")
def updateitem():
e1 = entry1.get()
e2 = entry2.get()
e3 = entry3.get()
e4 = entry4.get()
e5 = entry5.get()
with open("database_proj3.txt") as f1,
open("database_proj3a.txt", "w") as working:
for line in f1:
if str(e1) not in line:
working.write(line)
else:
working.write('{0} {1} {2} {3}
{4}'.format(str(e1), e2, e3, str(e4), e5))
f1.close()
working.close()
os.remove("database_proj3.txt")
#brought to you by code-projects.org
os.rename("database_proj3a.txt",
r"database_proj3.txt")
#1- seek() method − fileObject.seek(offset[,
whence])
#1.1- offset − This is the position of the
read/write pointer within the file.
#1.2- whence − This is optional and defaults to
0 which means absolute file positioning, other
values are 1 which means seek relative to the
current position and 2 means seek relative to
the file's end.
def searchitem():
i=0
e11 = entry1.get()
with open("database_proj3.txt") as working:
for line in working:
i += 1
if str(e11) in line:
break
try:
v = list(line.split(" "))
entry1.delete(0, END)
entry2.delete(0, END)
entry3.delete(0, END)
entry4.delete(0, END)
entry5.delete(0, END)
entry1.insert(0, str(v[0]))
entry2.insert(0, str(v[1]))
entry3.insert(0, str(v[2]))
entry4.insert(0, str(v[3]))
entry5.insert(0, str(v[4]))
except:
messagebox.showinfo("Title", "error end of
file")
working.close()
def clearitem():
entry1.delete(0, END)
entry2.delete(0, END)
entry3.delete(0, END)
entry4.delete(0, END)
entry5.delete(0, END)
print("3- database_proj3.txt is continuted")
label0= Label(root,text="PHARMACY MANAGEMENT
SYSTEM ",bg="GRAY",fg="white",font=("Times",
18))
label1=Label(root,text="ENTER ITEM NAME",bg="maroon",relief="ridge",fg="white",font=("Times",
10),width=20)
entry1=Entry(root , font=("Times", 10))
label2=Label(root, text="ENTER ITEM PRICE",bd="2",relief="ridge",height="1",bg="maroon",fg="white",
font=("Times", 10),width=20)
entry2= Entry(root, font=("Times", 10))
label3=Label(root, text="ENTER ITEM QUANTITY",bd="2",relief="ridge",bg="maroon",fg="white",
font=("Times", 10),width=20)
entry3= Entry(root, font=("Times", 10))
label4=Label(root, text="ENTER ITEM CATEGORY",bd="2",relief="ridge",bg="maroon",fg="white",
font=("Times", 10),width=20)
entry4= Entry(root, font=("Times", 10))
label5=Label(root, text="ENTER ITEM DISCOUNT",bg="maroon",relief="ridge",fg="white",
font=("Times", 10),width=20)
entry5= Entry(root, font=("Times", 10))
button1= Button(root, text="ADD ITEM", bg="white",
fg="black", width=20, font=("Times",
10),command=additem)
button2= Button(root, text="DELETE ITEM", bg="white",
fg="black", width =20, font=("Times",
10),command=deleteitem)
button3= Button(root, text="FIRST ITEM" , bg="white",
fg="black", width =20, font=("Times",
10),command=firstitem)
button4= Button(root, text="NEXT ITEM" , bg="white",
fg="black", width =20, font=("Times", 10),
command=nextitem)
button5= Button(root, text="PREVIOUS ITEM", bg="white",
fg="black", width =20, font=("Times",
10),command=previousitem)
button6= Button(root, text="LAST ITEM", bg="white",
fg="black", width =20, font=("Times",
10),command=lastitem)
button7= Button(root, text="UPDATE ITEM", bg="white",
fg="black", width =20, font=("Times",
10),command=updateitem)
button8= Button(root, text="SEARCH ITEM", bg="white",
fg="black", width =20, font=("Times",
10),command=searchitem)
button9= Button(root, text="CLEAR SCREEN", bg="white",
fg="black", width=20, font=("Times",
10),command=clearitem)
label0.grid(columnspan=6, padx=10, pady=10)
label1.grid(row=1,column=0, sticky=W, padx=10,
pady=10)
label2.grid(row=2,column=0, sticky=W, padx=10,
pady=10)
label3.grid(row=3,column=0, sticky=W, padx=10,
pady=10)
label4.grid(row=4,column=0, sticky=W, padx=10,
pady=10)
label5.grid(row=5,column=0, sticky=W, padx=10,
pady=10)
entry1.grid(row=1,column=1, padx=25, pady=10)
entry2.grid(row=2,column=1, padx=10, pady=10)
entry3.grid(row=3,column=1, padx=10, pady=10)
entry4.grid(row=4,column=1, padx=10, pady=10)
entry5.grid(row=5,column=1, padx=10, pady=10)
button3.grid(row=1,column=4, padx=25, pady=10)
button5.grid(row=2,column=4, padx=25, pady=10)
button4.grid(row=3,column=4, padx=25, pady=10)
button6.grid(row=4,column=4, padx=25, pady=10)
button1.grid(row=1,column=5, padx=25, pady=10)
button7.grid(row=2,column=5, padx=25, pady=10)
button8.grid(row=3,column=5, padx=25, pady=10)
button2.grid(row=4,column=5, padx=25, pady=10)
button9.grid(row=5,column=5, padx=25, pady=10)
button10= Button(root, text="CONTENT of
database_proj3.txt", bg="white", fg="black",
width=25, font=("Times", 8),command=printxx)
button10.grid(row=5,column=4, padx=25, pady=10)
Frame1 = Frame(root, borderwidth=3, bg="gray")
Frame1.grid(row=6,column=0, columnspan=5, padx=10,
pady=10)
Frame1a = Frame(Frame1, borderwidth=1, bg="silver")
Frame1a.grid(row=6,column=0, columnspan=5, padx=5,
pady=7)
label7a= Label(Frame1a,text="** if
database_proj3.txt not exists, System
automatically create this txt file & add 1 line
of Data",bg="silver",fg="Black",font=("Times",
10))
label7a.grid(row=8, columnspan=7, sticky=NW,
padx=3, pady=4)
label7b= Label(Frame1a,text="** if Size of
database_proj3.txt == 0, System automatically
add 1 line of Data to this txt file",bg="silver",fg="Black",font=("Times",
10))
label7b.grid(row=9, columnspan=7, sticky=NW,
padx=3, pady=4)
label8= Label(Frame1,text="1- To Navigate :
Click First or Preview or Next or Last Item
Buttons ",bg="silver",fg="black",font=("Times",
10))
label8.grid(row=10, columnspan=7, sticky=NW,
padx=3, pady=4)
label8a= Label(Frame1,text="2- Diplay Content of
database.txt into ListBox and Print all
items",bg="silver",fg="black",font=("Times",
10))
label8a.grid(row=11, columnspan=7, sticky=NW,
padx=3, pady=4)
label9= Label(Frame1,text="3- To Add Item: Click
Clear Screen, Type the correspending Item values
and then Click Add item",bg="silver",fg="black",font=("Times",
10))
label9.grid(row=12, columnspan=7, sticky=NW,
padx=3, pady=4)
label10= Label(Frame1,text="4- To Update Item:
modify the values of item and then Click Update
item",bg="silver",fg="black",font=("Times", 10))
label10.grid(row=13, columnspan=7, sticky=NW,
padx=3, pady=4)
label12= Label(Frame1,text="5- To Search Item:
Type in entry1 the item Name cooresponding and
then Click Search item",bg="silver",fg="black",font=("Times",
10))
label12.grid(row=14, columnspan=7, sticky=NW,
padx=3, pady=4)
label11= Label(Frame1,text="6- To Delete Item:
show/type the values of item cooresponding and
then Click delete item",bg="silver",fg="black",font=("Times",
10))
label11.grid(row=15, columnspan=7, sticky=NW,
padx=3, pady=4)
label13= Label(Frame1,text="7- To Clear Entries:
Click Clear Screen",bg="silver",fg="black",font=("Times",
10))
label13.grid(row=16, columnspan=7, sticky=NW,
padx=3, pady=4)
Frame2 = Frame(root, borderwidth=2,bg="gray")
Frame2.grid(row=6,column=5)#, columnspan=4, padx=5,
pady=10)
#1- ListBox
#1.1- label
labellistbox= Label(Frame2,text="CONTENT of
database_proj3.txt ",font=("Times", 8))
labellistbox.pack()
#1.2- Vertical & Horizontal scrollbars added to
listBox
scrollbar = Scrollbar(Frame2, orient="vertical")
scrollbar.pack(side=RIGHT, fill=Y)
scrollbarx = Scrollbar(Frame2,
orient="horizontal")
scrollbarx.pack(side=BOTTOM, fill= X)
#1.3- creating list box + scrollbars
lb = Listbox(Frame2, height=11, width=25,
yscrollcommand=scrollbar.set,xscrollcommand=scrollbarx.set)
lb.pack(expand=True, fill=Y)
scrollbar.config(command=lb.yview)
scrollbarx.config(command=lb.xview)
root.mainloop() | |
|
| | |
- Output:
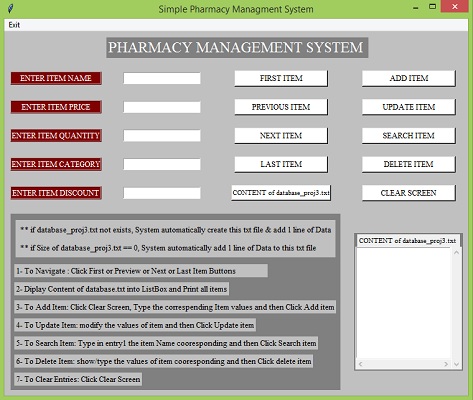 |
|
pic 1- Resultat after load application |
|
|
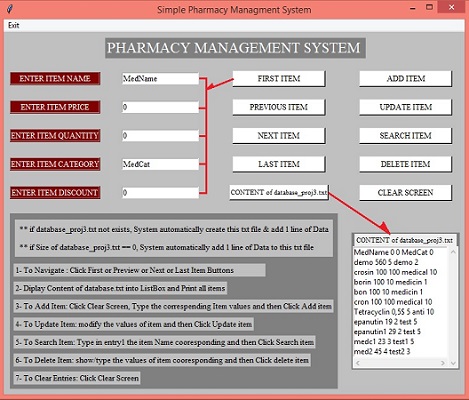 |
|
Pic 2- Resultat after click Buttons: FIRST ITEM
& CONTENTof database_project3.txt | |
| | |
|
| |
|
|
12- |
Python Program, Mini Management Hotel |
|
|
| |
|
- Python program of tkinter, Mini
Management Hotel
- Create a new Python project In Visual Studio 2019
- the
Microsoft Visual Studio (... or 2019) is
a powerful IDE for Python language
-
Open/Run Microsoft Visual Studio 2019
- To
view Python templates, search for python.
|
|
Select
the
Python Application template,
and select
Next. |
- Create a new Python project In Visual Studio 2019
On the Configure your new project
screen - (specify a name and
file location for the project, and then select
Create)
Project name:
Py-sys-avrg
Location: C:\Users\...\source\repos
(default location for
Visual Studio 2019)
|
- The new project opens in Visual Studio 2019
- (Visual Studio 2019 Compiler - IDE, to compile Python
project / file )
- The
Visual Studio Solution Explorer window shows the
project structure
- Python
Project
Proprieties -
Py-sys-avrg.
- Project
Folder:
C:\Users\...\source\repos\Py-sys-avrg
- Startup
File: checkin_gui_and_program.py
- Project
file: Py-sys-avrg.sln
|
- Download Python
Project :
Py-sys-avrg.zip - (578
KB zip file)
download
-
Project consist
of:
two Python Forms - (checkin_gui_and_program.py
+ recipt.py )
and two data files - (hotel.dat + recipt.txt)
and one picture file - (lcars_C1.png)
|
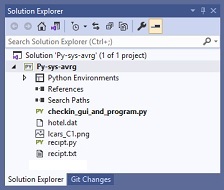 | |
|
Download Python
Project : Py-sys-avrg.zip - (578
KB zip file)
download |
- Source Code:
|
Download this Source Code at
python file: checkin_gui_and_program.py - (24.0 KB
Python file)
download
|
|
Download this Source Code at
python file recipt.py - (2.8 KB
Python file)
download
|
|
Download this DataBase
file: hotel.dat - (4.92
KB file)
download
|
|
Download this DataBase
file: recipt.txt - (0.37
KB file)
download
|
|
Continue
|
Python Code,
Mini Management Hotel | |
|
|
| |
| |
| 1. checkin_gui_and_program.py #! python, GUI
module
import os
import pickle
import sys
import os
from subprocess import call
import sys
try:
from Tkinter import *
except ImportError:
from tkinter import *
#from tkinter import scrolledtext
#import tkinter.scrolledtext as scrolledtext
try:
import ttk
py3 = False
except ImportError:
import tkinter.ttk as ttk
py3 = True
details_list=[]
def file_save():
NAME_PRO = details_list[0]
ADDRESS_PRO = details_list[1]
MOBILE_NO_PRO = details_list[2]
ROOM_NO_PRO = details_list[3]
PRICE_PRO = details_list[4]
listq=[str(NAME_PRO),str(ADDRESS_PRO),str(MOBILE_NO_PRO),str(ROOM_NO_PRO),str(PRICE_PRO)]
myVars = {'A':NAME_PRO,"B":ADDRESS_PRO,"C":MOBILE_NO_PRO,"D":ROOM_NO_PRO,"E":PRICE_PRO
}
fo=open("recipt.txt","w+")
for h in range(0,5):
fo.write(listq[h]+"\r\n")
fo.close()
call(["python", "recipt.py"])
u = list()
Delux = (1, 2, 3, 4, 5, 6, 7, 8, 9, 10)
Semi_Delux = (11, 12, 13, 14, 15, 16, 17, 18,
19, 20, 21, 22, 23, 24, 25)
General = (26, 27, 28, 29, 30, 31, 32, 33, 34,
35, 36, 37, 38, 39, 40, 41, 42, 43, 44, 45)
Joint_Room = (46, 47, 48, 49, 50, 46, 47, 48,
49, 50)
m = [9]
G = []
class save:
def __init__(self,NAME_PRO,ADDRESS_PRO,MOBILE_NO_PRO,ROOM_NO_PRO,PRICE_PRO):
self.name=NAME_PRO
self.address=ADDRESS_PRO
self.mobile_no=MOBILE_NO_PRO
self.room_no=ROOM_NO_PRO
self.price=PRICE_PRO
class HM_checkin:
def __init__(self):
self.NAME=""
self.ADDERESS=""
self.MOBILE=""
self.DAYS=0
self.price=0
self.room=0
def chk_name():
while True:
self.k = str(self.name.get())
a = self.k.isdigit()
if len(self.k) != 0 and a != True:
self.NAME=self.k
self.Text1.insert(INSERT, self.k +" - your name
has been inputed""\n")
self.Button1.configure(bg="#ffffff", borderwidth="5",
foreground="green")
break
else:
self.Text1.insert(INSERT, self.k + " - is
invalid input please input a valid name""\n")
break
def chk_add():
while True:
self.g = str(self.addr.get())
ak = self.g.isdigit()
if len(self.g)!= 0 and ak!=True:
self.ADDERESS=self.g
self.Text1.insert(INSERT, self.g +" - your
address has been inputed\n")
self.Button2.configure(bg="#ffffff", borderwidth="5",
foreground="green")
break
else:
self.Text1.insert(INSERT, self.g +" - is invalid
input please input a valid address\n")
break
def chk_mo():
while True:
self.h = str(self.mobile.get())
if self.h.isdigit() == True and len(self.h) != 0
and len(self.h) == 8:
self.MOBILE = self.h
self.Text1.insert(INSERT, self.h +" - your
mobile number has been inputed""\n")
self.Button3.configure(bg="#ffffff", borderwidth="5",
foreground="green")
break
else:
self.Text1.insert(INSERT, self.h +" - is invalid
input please input a valid mobile number""\n")
break
def chk_day():
while True:
self.l = str(self.days.get())
if self.l.isdigit() == True and len(self.l) !=
0:
self.DAYS = int(self.l)
self.Text1.insert(INSERT,self.l +" days has been
inputed""\n")
self.Button5.configure(bg="#ffffff", borderwidth="5",
foreground="green")
break
else:
self.Text1.insert(INSERT, self.l +" - is invalid
input ""\n")
break
def enter(self):
self.name = self.NAME
self.address = self.ADDERESS
self.mobile_no = self.MOBILE
self.no_of_days = int(self.DAYS)
def tor(self):
if self.ch == 1:
self.price = (200 * self.no_of_days)
q2=str(self.no_of_days)
q3=" day(s) for Deluxe Room, total Price "
q4=str(self.price)
self.Text1.insert(INSERT, q2 + q3 + q4 +
"$""\n")
m[0] = 1
elif self.ch == 2:
self.price =(150 * self.no_of_days)
q2=str(self.no_of_days)
q3=" day(s) for Deluxe Room, total Price "
q4=str(self.price)
self.Text1.insert(INSERT, q2 + q3 + q4 +
"$""\n")
m[0] = 2
elif self.ch == 3:
self.price =(170 * self.no_of_days)
q2=str(self.no_of_days)
q3=" day(s) for Deluxe Room, total Price "
q4=str(self.price)
self.Text1.insert(INSERT, q2 + q3 + q4 +
"$""\n")
m[0] = 3
elif self.ch == 4:
self.price = (100 * self.no_of_days)
q2=str(self.no_of_days)
q3=" day(s) for Deluxe Room, total Price "
q4=str(self.price)
self.Text1.insert(INSERT, q2 + q3 + q4 +
"$""\n")
m[0] = 4
def payment_option(self):
op = self.p
if op == 1:
self.Text1.insert(INSERT, "no discount""\n")
elif op == 2:
self.price = self.price - ((self.price * 10) /
100)
self.Text1.insert(INSERT, "10% discount""\n")
def bill(self):
if m[0] == 1:
a = Delux
elif m[0] == 2:
a = Semi_Delux
elif m[0] == 3:
a = General
elif m[0] == 4:
a = Joint_Room
G = []
f2 = open("hotel.dat", "rb")
try:
while True:
s = pickle.load(f2)
k = s.room_no
G.append(k)
continue
except EOFError:
pass
for r in a:
if r not in G:
self.room = r
break
else:
continue
self.room = r
f2.close()
details_list.append(self.name)
details_list.append(self.address)
details_list.append(self.mobile_no)
details_list.append(self.room)
details_list.append(self.price)
file_save()
def submit_clicked():
if self.var1.get()==1 and self.var2.get()==0 and
self.var3.get()==0 and self.var4.get()==0 and
self.var5.get()==1 and self.var6.get()==0:
self.ch=1
self.p=2
enter(self)
tor(self)
payment_option(self)
bill(self)
self.Button4.configure(bg="#ffffff", borderwidth="5",
foreground="green")
elif self.var1.get() == 1 and self.var2.get() ==
0 and self.var3.get() == 0 and self.var4.get()
== 0 and self.var5.get() == 0 and
self.var6.get() == 1:
self.ch = 1
self.p = 1
enter(self)
tor(self)
payment_option(self)
bill(self)
self.Button4.configure(bg="#ffffff", borderwidth="5",
foreground="green")
elif self.var1.get() == 0 and self.var2.get() ==
1 and self.var3.get() == 0 and self.var4.get()
== 0 and self.var5.get() == 0 and
self.var6.get() == 1:
self.ch = 2
self.p = 1
enter(self)
tor(self)
payment_option(self)
bill(self)
self.Button4.configure(bg="#ffffff", borderwidth="5",
foreground="green")
elif self.var1.get() == 0 and self.var2.get() ==
1 and self.var3.get() == 0 and self.var4.get()
== 0 and self.var5.get() == 1 and
self.var6.get() ==0 :
self.ch = 2
self.p = 2
enter(self)
tor(self)
payment_option(self)
bill(self)
self.Button4.configure(bg="#ffffff", borderwidth="5",
foreground="green")
elif self.var1.get() == 0 and self.var2.get() ==
0 and self.var3.get() == 1 and self.var4.get()
== 0 and self.var5.get() == 0 and
self.var6.get() == 1:
self.ch = 3
self.p = 1
enter(self)
tor(self)
payment_option(self)
bill(self)
self.Button4.configure(bg="#ffffff", borderwidth="5",
foreground="green")
elif self.var1.get() == 0 and self.var2.get() ==
0 and self.var3.get() == 1 and self.var4.get()
== 0 and self.var5.get() == 1 and
self.var6.get() == 0:
self.ch = 3
self.p = 2
enter(self)
tor(self)
payment_option(self)
bill(self)
elif self.var1.get() == 0 and self.var2.get() ==
0 and self.var3.get() == 0 and self.var4.get()
== 1 and self.var5.get() == 0 and
self.var6.get() == 1:
self.ch = 4
self.p = 1
enter(self)
tor(self)
payment_option(self)
bill(self)
elif self.var1.get() == 0 and self.var2.get() ==
0 and self.var3.get() == 0 and self.var4.get()
== 1 and self.var5.get() == 1 and
self.var6.get() == 0:
self.ch = 4
self.p = 2
enter(self)
tor(self)
payment_option(self)
bill(self)
else:
self.Text1.insert(INSERT, "invalid choice please
input a valid choice""\n")
root = Tk()
'''This class configures and populates the
toplevel window.
top is the toplevel containing window.'''
_bgcolor = '#ffffff' # X11 color: 'white'
_fgcolor = '#000000' # X11 color: 'black'
_compcolor = '#ffffff' # X11 color: 'white'
_ana1color = '#ffffff' # X11 color: 'white'
_ana2color = '#ffffff' # X11 color: 'white'
font10 = "-family {Times New Roman} -size 10
-weight bold -slant" \
" roman -underline 0 -overstrike 0"
font12 = "-family {Times New Roman} -size 12
-weight bold -slant " \
"roman -underline 0 -overstrike 0"
font18 = "-family {Times New Roman} -size 18
-weight bold -slant " \
"roman -underline 0 -overstrike 0"
#---------Form, Center of Screen--
window_width = 1000
window_height = 700
# get the screen size of your computer [width
and height using the root object as foolows]
screen_width = root.winfo_screenwidth()
screen_height = root.winfo_screenheight()
# Get the window position from the top
dynamically as well as position from left or
right as follows
position_top = int((screen_height/2 -window_height/2
)-30)
position_right = int((screen_width / 2 -
window_width/2)-30)
# this is the line that will center your window
root.geometry(f'{window_width}x{window_height}+{position_right}+{position_top}')
#--------------
root.title('PYTHON HOTEL')
root.configure(bg='#d9d9d9', highlightcolor='black')
# Creating Menubar
menubar = Menu(root)
# Adding exit Menu and commands
Ext = Menu(menubar, tearoff = 0)
menubar.add_command(label ='Exit', font=font10,
command = root.destroy)
# display Menu
root.config(menu = menubar)
self.Frame1 = Frame(root)
self.Frame1.place(relx=0.03, rely=0.05,
relheight=0.12, relwidth=0.93)
self.Frame1.configure(relief=GROOVE, borderwidth="2",
bg="navy", highlightcolor="white", width=995)
self.Message1 = Message(self.Frame1)
self.Message1.place(relx=0.04, rely=0.11,
relheight=0.84, relwidth=0.5)
self.Message1.configure(bg="navy", font=font18,
foreground="#ffffff", highlightcolor="black",
text='''CHECK INN''', width=496)
self.Message2 = Message(self.Frame1)
self.Message2.place(relx=0.52, rely=0.18,
relheight=0.74, relwidth=0.07)
self.Message2.configure(bg="navy", font=font18,
foreground="#ffffff", highlightcolor="black",
width=66)
self.Message3 = Message(self.Frame1)
self.Message3.place(relx=0.57, rely=0.11,
relheight=0.79, relwidth=0.35)
self.Message3.configure(bg="navy", font=font18,
foreground="#ffffff", highlightcolor="black",
width=347)
#self.menubar = Menu(root,font=font10,bg=_bgcolor,fg=_fgcolor)
#root.configure(menu = self.menubar)
self.Frame2 = Frame(root)
self.Frame2.place(relx=0.03, rely=0.18,
relheight=0.49, relwidth=0.93)
self.Frame2.configure(relief=GROOVE, borderwidth="2",bg="#ffffff",
highlightcolor="black", width=995)
self.Label0 = Label(self.Frame2)
self.Label0.place(relx=0.001, rely=0.0001,
height=30, width=296)
self.Label0.configure(activeforeground="black",
bg="#ffffff", disabledforeground="#bfbfbf",
font=font12, foreground="maroon", highlightcolor="black",
text='''1- ENTER the IDENTIFFICATION ''')
self.Label3 = Label(self.Frame2)
self.Label3.place(relx=0.05, rely=0.11,
height=30, width=289)
self.Label3.configure(activeforeground="black",
bg="#ffffff", disabledforeground="#bfbfbf",
font=font10, foreground="#000000",
highlightcolor="black", text='''ENTER YOUR
NAME''')
self.Label4 = Label(self.Frame2)
self.Label4.place(relx=0.05, rely=0.33,
height=30, width=289)
self.Label4.configure(activeforeground="black",
bg="#ffffff", disabledforeground="#bfbfbf",
font=font10, foreground="#000000",
highlightcolor="black", text='''ENTER YOUR
NUMBER''')
self.Label5 = Label(self.Frame2)
self.Label5.place(relx=0.05, rely=0.22,
height=30, width=289)
self.Label5.configure(activeforeground="black",
bg="#ffffff", disabledforeground="#bfbfbf",
font=font10, foreground="#000000",
highlightcolor="black", text='''ENTER YOUR
ADDRESS''')
self.Label6 = Label(self.Frame2)
self.Label6.place(relx=0.001, rely=0.52,
height=30, width=296)
self.Label6.configure(activeforeground="black",
bg="#ffffff", disabledforeground="#bfbfbf",
font=font12, foreground="maroon", highlightcolor="black",
text='''2- CHOOSE YOUR ROOM TYPE ''')
self.Label7 = Label(self.Frame2)
self.Label7.place(relx=0.001, rely=0.8,
height=30, width=296)
self.Label7.configure(activeforeground="black",
bg="#ffffff", disabledforeground="#bfbfbf",
font=font12, foreground="maroon", highlightcolor="black",
text='''3- CHOOSE PAYMENT METHOD ''')
self.Message4 = Message(self.Frame2)
self.Message4.place(relx=0.41, rely=0.11,
relheight=0.1, relwidth=0.03)
self.Message4.configure(bg="#ffffff",
font=font10, highlightcolor="black",
text='''::''', width=36)
self.Message5 = Message(self.Frame2)
self.Message5.place(relx=0.41, rely=0.22,
relheight=0.1, relwidth=0.03)
self.Message5.configure(bg="#ffffff",
font=font10, highlightcolor="black",
text='''::''', width=36)
self.Message6 = Message(self.Frame2)
self.Message6.place(relx=0.41, rely=0.33,
relheight=0.1, relwidth=0.03)
self.Message6.configure(bg="#ffffff",
font=font10, highlightcolor="black",
text='''::''', width=36)
self.Checkbutton1 = Checkbutton(self.Frame2)
self.var1 = IntVar()
self.Checkbutton1.place(relx=0.15, rely=0.61,
relheight=0.11, relwidth=0.30 )
self.Checkbutton1.configure(bg="#ffffff",
disabledforeground="#bfbfbf", font=font10,
foreground="#000000", highlightcolor="black",
justify=LEFT, text='''Rom Deluxe (1 ... 10) ''',
variable=self.var1)
self.Checkbutton2 = Checkbutton(self.Frame2)
self.var2 = IntVar()
self.Checkbutton2.place(relx=0.15, rely=0.71,
relheight=0.11, relwidth=0.30 )
self.Checkbutton2.configure(bg="#ffffff",
disabledforeground="#bfbfbf", font=font10,
foreground="#000000", highlightcolor="black",
justify=CENTER, text='''Rom Semi Deluxe (11 ...
25)''', variable=self.var2)
self.Checkbutton3 = Checkbutton(self.Frame2)
self.var3 = IntVar()
self.Checkbutton3.place(relx=0.5, rely=0.61,
relheight=0.11, relwidth=0.3)
self.Checkbutton3.configure(bg="#ffffff",
disabledforeground="#bfbfbf", font=font10,
foreground="#000000", highlightcolor="black",
justify=LEFT, text='''Rom General (26 ...
45)''', variable=self.var3)
self.Checkbutton4 = Checkbutton(self.Frame2)
self.var4 = IntVar()
self.Checkbutton4.place(relx=0.5, rely=0.71,
relheight=0.11, relwidth=0.3)
self.Checkbutton4.configure(bg="#ffffff",
disabledforeground="#bfbfbf", font=font10,
foreground="#000000", highlightcolor="black",
justify=LEFT, text='''Rom Join (46 ... 50) ''',
variable=self.var4)
self.Checkbutton5 = Checkbutton(self.Frame2)
self.var5 = IntVar()
self.Checkbutton5.place(relx=0.5, rely=0.88,
relheight=0.11, relwidth=0.3)
self.Checkbutton5.configure(bg="#ffffff",
disabledforeground="#bfbfbf", font=font10,
foreground="#000000", highlightcolor="black",
justify=LEFT, text='''By Credit/Debit Card''',
variable=self.var5)
self.Checkbutton6 = Checkbutton(self.Frame2)
self.var6 = IntVar()
self.Checkbutton6.place(relx=0.15, rely=0.88,
relheight=0.11, relwidth=0.30)
self.Checkbutton6.configure(bg="#ffffff",
disabledforeground="#bfbfbf", font=font10,
foreground="#000000", highlightcolor="black",
justify=LEFT, text='''By Cash ''',
variable=self.var6)
self.Message7 = Message(self.Frame2)
self.Message7.place(relx=0.41, rely=0.44,
relheight=0.1, relwidth=0.03)
self.Message7.configure(bg="#ffffff",
font=font10, highlightcolor="black",
text='''::''', width=36)
self.Button1 = Button(self.Frame2)
self.Button1.place(relx=0.91, rely=0.11,
height=30, width=43)
self.Button1.configure(activeforeground="#000000",
bg="silver", disabledforeground="#bfbfbf",
foreground="red", highlightcolor="black",
font=font10, pady="0", text='''Test''',command=chk_name)
self.Button2 = Button(self.Frame2)
self.Button2.place(relx=0.91, rely=0.22,
height=30, width=43)
self.Button2.configure(activeforeground="#000000",
bg="silver", disabledforeground="#bfbfbf",
foreground="red", highlightcolor="black",
font=font10, pady="0", text='''Test''',command=chk_add)
self.Button3 = Button(self.Frame2)
self.Button3.place(relx=0.91, rely=0.33,
height=30, width=43)
self.Button3.configure(activeforeground="#000000",
bg="silver", disabledforeground="#bfbfbf",
foreground="red", highlightcolor="black",
font=font10, pady="0", text='''Test''',command=chk_mo)
self.Frame2a = Frame(self.Frame2)
self.Frame2a.place(relx=0.77, rely=0.65,
relheight=0.3, relwidth=0.2)
self.Frame2a.configure(relief=GROOVE,
borderwidth="2",bg="gray", highlightcolor="black",
width=100)
self.Button4 = Button(self.Frame2a)
self.Button4.place(relx=0.17, rely=0.39,
height=25, width=125)
self.Button4.configure(activeforeground="#000000",
bg="silver", disabledforeground="#bfbfbf",
font=font10, foreground="red", highlightcolor="black",
pady="0", text='''SUBMIT''', command=submit_clicked)
self.Label1 = Label(self.Frame2)
self.Label1.place(relx=0.05, rely=0.44,
height=30, width=289)
self.Label1.configure(activeforeground="black",
bg="#ffffff", disabledforeground="#bfbfbf",
font=font10, foreground="#000000",
highlightcolor="black", text='''NUMBER OF
DAYS''')
#name
self.Entry3 = Entry(self.Frame2)
self.name=StringVar()
self.Entry3.place(relx=0.47,
rely=0.11,height=30, relwidth=0.43)
self.Entry3.configure(bg="white",
disabledforeground="#bfbfbf",font=font10,
foreground="#000000", highlightcolor="black",
selectforeground="black", textvariable=self.name)
#addr
self.Entry5 = Entry(self.Frame2)
self.addr = StringVar()
self.Entry5.place(relx=0.47,
rely=0.22,height=30, relwidth=0.43)
self.Entry5.configure(bg="white",
disabledforeground="#bfbfbf",font=font10,
foreground="#000000", highlightcolor="black",
selectforeground="black", textvariable=self.addr)
#mobile
self.Entry4 = Entry(self.Frame2)
self.mobile=StringVar()
self.Entry4.place(relx=0.47,
rely=0.33,height=30, relwidth=0.43)
self.Entry4.configure(bg="white",
disabledforeground="#bfbfbf",font=font10,
foreground="#000000", highlightcolor="black",
selectforeground="black", textvariable=self.mobile)
#days
self.Entry1 = Entry(self.Frame2)
self.days=StringVar()
self.Entry1.place(relx=0.47, rely=0.44,
height=30, relwidth=0.43)
self.Entry1.configure(bg="white",
disabledforeground="#bfbfbf",font=font10,
foreground="#000000", highlightcolor="black",
insertbackground="black", selectbackground="#e6e6e6",
selectforeground="black", textvariable=self.days)
self.Button5 = Button(self.Frame2)
self.Button5.place(relx=0.91, rely=0.44,
height=30, width=43)
self.Button5.configure(activeforeground="#000000",
bg="silver", disabledforeground="#bfbfbf",
foreground="red", highlightcolor="black",
font=font10, pady="0", text='''Test''', command=chk_day)
# Text1 - Test
self.Frame3 = Frame(root)
self.Frame3.place(relx=0.03, rely=0.68,
relheight=0.23, relwidth=0.3)
self.Frame3.configure(relief=GROOVE, borderwidth="5",
bg="navy", highlightcolor="black", width=995)
self.Text1 = Text(self.Frame3)
self.Text1.place(relx=0.0001, rely=0.001,
height=150, width=290) #relheight=0.20, relwidth=0.80)
#height=150, width=700) #relheight=0.29,
relwidth=0.93
scroll_y = Scrollbar(self.Text1,
orient="vertical", command=self.Text1.yview)
scroll_y.pack(side="left", expand=True,
fill="y", anchor ='ne')
self.Text1.configure(yscrollcommand=scroll_y.set)
self.Text1.configure(bg="white", borderwidth="2",
font=font10, foreground="black", highlightcolor="black",
insertbackground="black", selectbackground="#e6e6e6",
selectforeground="black")
self.Text1.insert(INSERT, " ------ Test
------""\n")
self.Frame3a = Frame(root)
self.Frame3a.place(relx=0.55, rely=0.68,
relheight=0.23, relwidth=0.3)
self.Frame3a.configure(relief=GROOVE,
borderwidth="5", bg="maroon", highlightcolor="black",
width=995)
# show picture
img=PhotoImage(file = "lcars_C1.png")
Label(self.Frame3a ,image = img).pack(anchor =
'center')
self.Label10 = Label(root)
self.Label10.place(relx=0.001, rely=0.91,
height=35, width=600)
self.Label10.configure(activeforeground="black",
bg='#d9d9d9', disabledforeground="#bfbfbf",
font=font10, foreground="#000000",
highlightcolor="black", text='''NOTE: Price of
Room by Day: Deluxe = 200$, Semi Deluxe = 170$,
General = 150$, Join = 100$''')
root.mainloop()
if __name__ == '__main__':
hotel=HM_checkin() |
| |
| | |
| |
2. recipt.py
#! python, GUI module
#from main import *
import sys
try:
from Tkinter import *
except ImportError:
from tkinter import *
try:
import ttk
py3 = False
except ImportError:
import tkinter.ttk as ttk
py3 = True
fo1=open("recipt.txt","r")
list1=fo1.readlines()
del list1[1]
del list1[2]
del list1[3]
del list1[4]
del list1[5]
list1[0]=list1[0][:-1]
list1[1]=list1[1][:-1]
list1[2]=list1[2][:-1]
list1[3]=list1[3][:-1]
list1[4]=list1[4][:-1]
p='''
@@@@@@@@@@@ PYTHON HOTEL AND RESORTS @@@@@@@@@@@@@
@@@@@@@@@@@@@@@@@@@@@@@@@@@@@@@@@@@@@@@@@@@@@@@@@@@@@
@@@@@@@@@@ SERVING GUEST @@@@@@@@@@
@@@@@@@@@@@@@@@ ######### @@@@@@@@@@@@@@@@@
@@@@@@@@@@@@@@@@@@@@@@@@@@@@@@@@@@@@@@@@@@@@@@@@@@@@@
NAME-%s
ADDRESS-%s
MOBILE NO.-%s
YOUR TOTAL BILL IS Rs.-%s
YOUR ROOM NUMBER IS %s
'''%(list1[0],list1[1],list1[2],list1[4],list1[3])
class recipt:
def __init__(self):
root=Tk()
'''This class configures and populates the toplevel window.
top is the toplevel containing window.'''
_bgcolor = '#d9d9d9' # X11 color: 'gray85'
_fgcolor = '#000000' # X11 color: 'black'
_compcolor = '#d9d9d9' # X11 color: 'gray85'
_ana1color = '#d9d9d9' # X11 color: 'gray85'
_ana2color = '#d9d9d9' # X11 color: 'gray85'
#---------Form, Center of Screen--
window_width = 750
window_height = 450
# get the screen size of your computer [width and height using the root object as foolows]
screen_width = root.winfo_screenwidth()
screen_height = root.winfo_screenheight()
# Get the window position from the top dynamically as well as position from left or right as follows
position_top = int(screen_height/2 -window_height/2)
position_right = int(screen_width / 2 - window_width/2)
# this is the line that will center your window
root.geometry(f'{window_width}x{window_height}+{position_right}+{position_top}')
root.title('Reciption')
root.configure(background='#d9d9d9', highlightbackground='#d9d9d9', highlightcolor='black')
# Creating Menubar
menubar = Menu(root)
# Adding Done Menu and commands
Done = Menu(menubar, tearoff = 0)
menubar.add_command(label ='Done', command = root.destroy)
# display Menu
root.config(menu = menubar)
self.Label1 = Label(root)
self.Label1.place(relx=0, rely=0, height=800, width=800)
self.Label1.configure(background="#d9d9d9", disabledforeground="#a3a3a3", foreground="#000000", text=p, anchor=N, wraplength=1000, justify =LEFT, width=582)
root.mainloop()
if __name__ == '__main__':
recipt1=recipt() |
|
| | |
- Output:
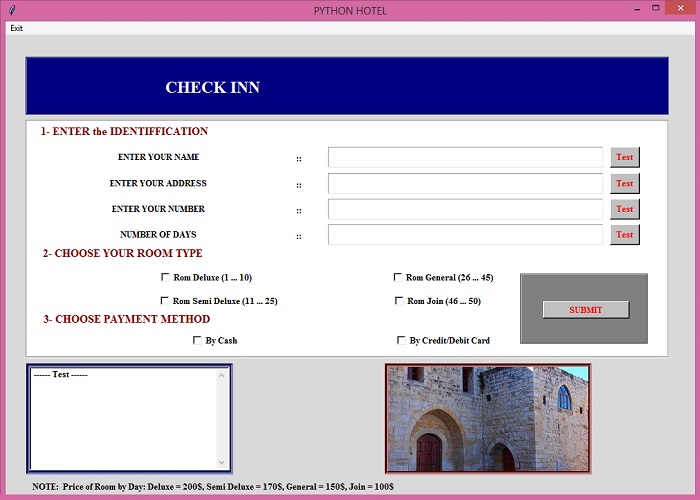 |
|
Pic 1- Mini
Management Hotel after load |
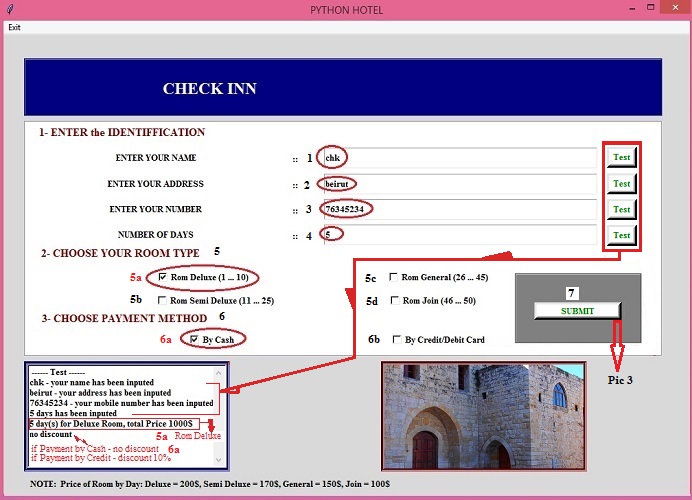 |
| Pic 2 -
Mini Management Hotel, View with data entry
|
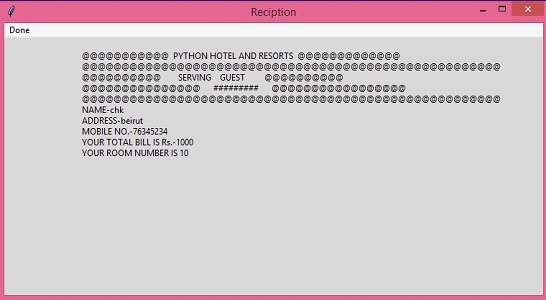 |
|
pic 3 - Reciption >>>>> ( at recipt.py) |
|
| | |
|
|
| |
Python Pages -
1
2
3 4 5 6 |
| |
| www.puresoftwarecode.com
: |
|
HUMANITIES
Institute |
ART Institute &
Others |
| SOFTWARE
Institute - "Free, 120 Training Courses" |
CHRISTIANITY
Institute |
|
|
| Python, Teach yourSelf Programs in 6 pages, in English |
|
Le HANDICAP c'est quoi ? (in
French) |
Basilica Architecture, in the Shape
of a Cross |
| VISUAL STUDIO 2019, C# Programs, in English |
Holy BIBLE in 22 Languages and Studies
... |
Drugs and Treatment in English, french,
Arabic |
Old Traditional Lebanese
houses |
| VISUAL STUDIO 2010 in
English |
220 Holy Christian
ICONS |
Classification of Wastes from the Source
in Arabic |
5 DRAWING Courses & 3
Galleries |
| VISUAL STUDIO .NET, Windows & ASP in
English |
Catholic Syrian MARONITE Church
|
|
Meteora,
Christianity Monasteries - En, Ar,
Fr |
| VISUAL STUDIO 6.0 in
English |
HOLY MASS of Maronite Church - Audio
in Arabic |
Christianity in the Arabian Peninsula in
Arabic |
Monasteries of Mount Athos &
Pilgrimage |
| Microsoft ACCESS in
English |
VIRGIN MARY, Mother of JESUS CHRIST
GOD |
Summary of the Lebanese history in
Arabic |
Carved Rock Churches, in Lalibela,
Ethiopia |
| PHP & MySQL in
English |
SAINTS of the Church |
LEBANON EVENTS 1840 & 1860, in
Arabic |
|
| SOFTWARE GAMES in
English |
Saint SHARBEL - Sharbelogy in 10
languages, Books |
Great FAMINE in LEBANON 1916, in
Arabic |
my PRODUCTS, and Statistiques
... |
| WEB DESIGN in English |
Catholic RADIO in Arabic, Sawt el
Rab |
Great FAMINE and Germny Role 1916,
in Arabic |
|
| JAVA SCRIPT in
English |
Читать -
БИБЛИЯ и Шарбэль cвятой, in Russe |
Armenian Genocide 1915 in
Arabic |
4 Different
STUDIES |
| FLASH - ANIMATION in
English |
|
Sayfo or Assyrian Genocide 1915 in
Arabic |
SOLAR Energy & Gas
Studies |
| PLAY, 5 GAMES |
|
|
|
| |
|
Christianity in Turkey in
Arabic |
WELCOME to LEBANON |
| SAADEH BEJJANE
Architecture |
Andree Zouein
Foundation |
|
YAHCHOUCH, my Lebanese
Village |
| CARLOS SLIM HELU Site. new
design |
REPORT, Cyber Attack Attacks the Current
Site |
Prononce English and French and Arabic
Letters |
ZOUEIN, my Family - History &
Trees | |
|
|
| | |


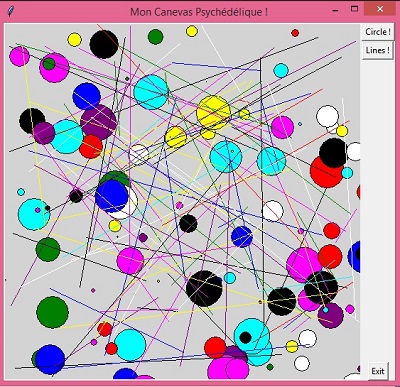
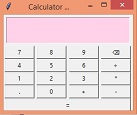
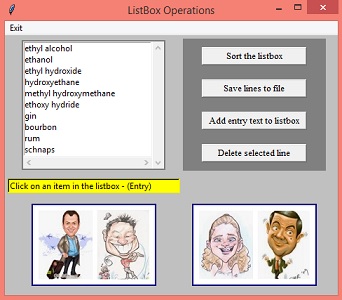
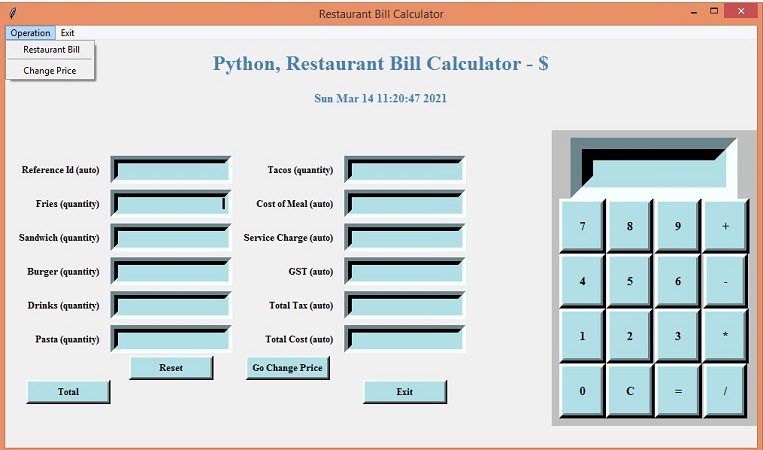
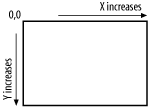
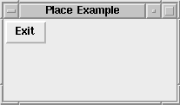
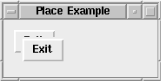
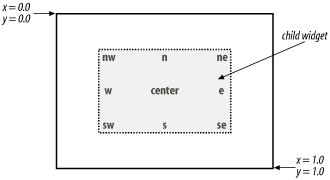
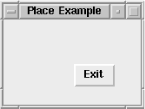
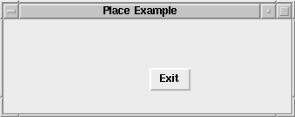
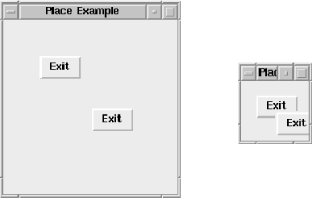
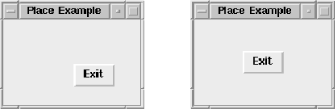
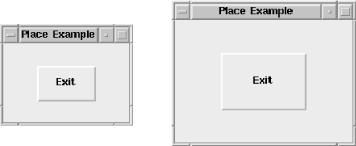


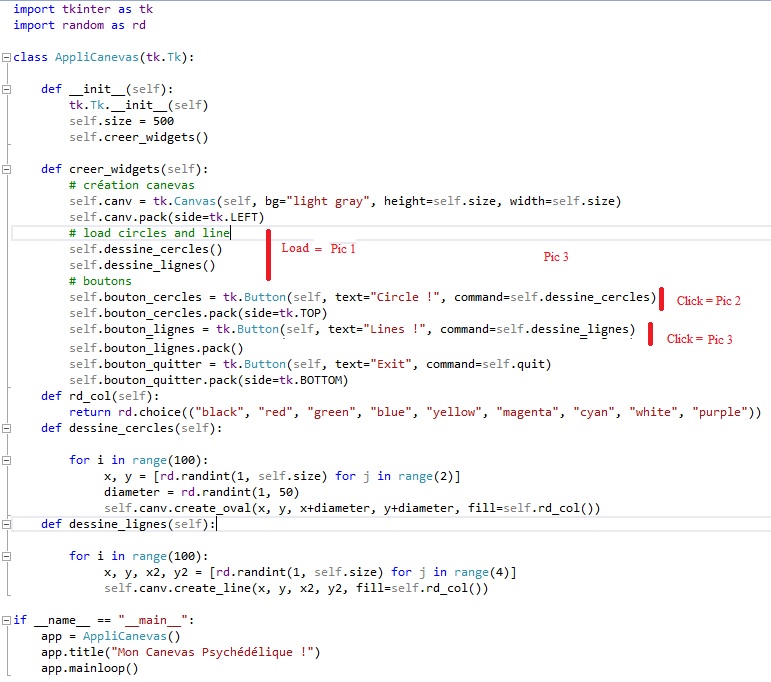
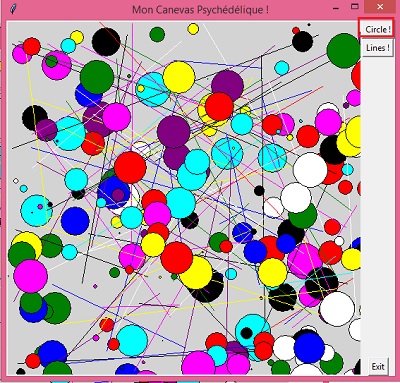


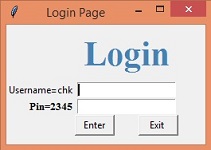 Pic 1, pyt_restaurent.py
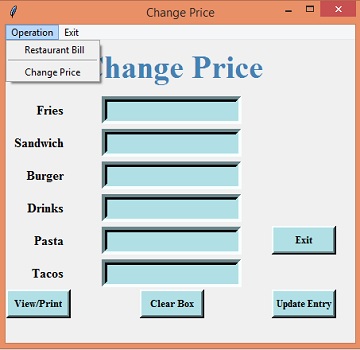 Pic 3,
price.py
Pic 3,
price.py


